
Oh, I remember the first time I truly fell in love with a simple appetizer that just *clicked* with everyone. It was a Saturday evening, my house bustling with my three amazing kids, their friends, and a few neighbors who’d popped over. Dinner was still a little ways off, and the usual pre-meal snack rush was in full swing.
My pantry was looking a bit sparse, but then my eyes landed on a jar of briny, beautiful olives. An idea sparked. I decided to whip up something quick, something that felt a little fancy but was ridiculously easy.
That night, Crispy Fried Olives with Garlic Aioli made their grand debut in our kitchen, and let me tell you, they were an instant sensation. The kids, who usually eye anything new with suspicion, devoured them! The salty, slightly bitter pop of the olives, encased in a golden, crunchy coating, dipped into a creamy, zesty garlic aioli – it was pure magic.
This isn’t just a recipe; it’s a memory maker, a testament to how simple ingredients can create something extraordinary, perfect for any gathering or just a quiet evening snack. Every time I make these Crispy Fried Olives with Garlic Aioli now, I’m transported back to that joyful evening, and my heart just swells with gratitude for the joy food brings. You will absolutely adore making and sharing this delightful fried olive appetizer.
Why You’ll Love This Crispy Fried Olives with Garlic Aioli Recipe
You absolutely need this Crispy Fried Olives with Garlic Aioli recipe in your life! First, it is incredibly easy. Seriously, even on your busiest days, you can whip up this elegant snack in no time.
Second, the flavor profile is outstanding. The salty, briny olives become wonderfully mellow and soft inside, while the exterior develops a golden-brown crispness that is utterly addictive. Then, you dip them into a vibrant, homemade garlic aioli.
This aioli is creamy, garlicky, and provides the perfect tangy counterpoint to the rich, fried olives. It transforms a simple olive into a gourmet experience. It’s an unexpected crowd-pleaser; people rave about these fried olives every single time I serve them.
It’s a fantastic way to introduce olives to picky eaters, too. My kids call them “crunchy olive bites.” Furthermore, this dish is versatile. Serve it as an appetizer, a side dish, or even a sophisticated snack.
You will appreciate the simplicity and the incredible taste of these Crispy Fried Olives with Garlic Aioli. It truly is a recipe that brings joy to the table.
Ingredients You’ll Need
Gathering your ingredients for these incredible Crispy Fried Olives with Garlic Aioli is simple. You likely have most of these items already in your pantry. We need a good quality jar of olives for the best flavor.
For the perfect crisp, use standard breading ingredients. The aioli, while seemingly fancy, uses everyday items. This combination creates a truly memorable dish. Prepare to impress everyone with these delightful fried olives and their creamy dipping sauce.

| Ingredient | Quantity |
|---|---|
| Pitted Green Olives (such as Manzanilla or Castelvetrano) | 16 oz (1 large jar), drained and patted very dry |
| All-Purpose Flour | 1/2 cup |
| Eggs, large | 2, beaten |
| Panko Breadcrumbs | 1 cup |
| Garlic Powder | 1/2 teaspoon (for breading) |
| Salt | 1/4 teaspoon (for breading) |
| Black Pepper | 1/4 teaspoon (for breading) |
| Vegetable Oil or Canola Oil | 2-3 cups (for frying) |
| Mayonnaise | 1/2 cup (for aioli) |
| Garlic, minced | 1-2 cloves (for aioli, to taste) |
| Lemon Juice, fresh | 1 tablespoon (for aioli) |
| Dijon Mustard | 1 teaspoon (for aioli, optional) |
| Fresh Parsley, chopped | 2 tablespoons (for garnish, optional) |
Substitutions & Variations
The beauty of a simple recipe like Crispy Fried Olives with Garlic Aioli lies in its adaptability. You can easily tweak ingredients to suit your taste or what you have on hand. Don’t let a missing ingredient stop you from making these incredible fried olives!
For starters, the olives themselves offer variety. While pitted green olives are classic, you can absolutely experiment. Try Kalamata olives for a deeper, fruitier flavor, or even a mix of green and black olives for visual appeal and varied taste.
Just ensure they are pitted and drained well. If you prefer a gluten-free option, substitute the all-purpose flour with a gluten-free flour blend and use gluten-free panko breadcrumbs. The results will be just as crispy and delicious.
For the breading, feel free to add other seasonings. A pinch of dried oregano, a dash of smoked paprika, or even some grated Parmesan cheese mixed into the panko will elevate the flavor profile. Imagine a cheesy, crispy coating on your fried olives!
Now, let’s talk about the star alongside the olives: the garlic aioli. While my recipe offers a quick, cheats-style aioli using mayonnaise, you can certainly make a traditional aioli from scratch with egg yolks and olive oil for a richer, more authentic experience. If you’re not a fan of garlic, you can try different flavorings for the aioli.
Consider a lemon-herb aioli by adding fresh dill or chives, or a spicy aioli with a dash of sriracha or a pinch of cayenne pepper. For a lighter dip, Greek yogurt can partially or fully replace the mayonnaise, offering a tangier, healthier alternative. You could also offer a variety of dipping sauces alongside the Crispy Fried Olives with Garlic Aioli for guests to choose from.
Think marinara sauce, a sweet chili dip, or even a ranch dressing. For those who enjoy a bit of heat, a sprinkle of red pepper flakes over the finished Crispy Fried Olives with Garlic Aioli adds a wonderful kick. These simple adjustments ensure that every batch of fried olives you make feels fresh and exciting, perfectly tailored to your family’s preferences. Enjoy making this versatile dish!
Just as you can experiment with different olives for this recipe, the principle of adapting ingredients and techniques applies to many other dishes. For another take on achieving satisfying crispiness in a homemade dish, consider learning How to Make Taco Shells: The Ultimate Guide to Homemade Soft & Crispy Tacos.
Step-by-Step Instructions
Creating these delightful Crispy Fried Olives with Garlic Aioli is a straightforward process. Follow these steps carefully, and you will achieve perfectly golden and delicious results every time. Remember, prep is key for smooth frying. These instructions ensure your fried olives come out absolutely perfect, ready for dipping in that amazing garlic aioli.
- Prepare the Olives: Begin by draining your olives thoroughly. Use paper towels to pat them very, very dry. Any excess moisture will prevent the breading from sticking and can cause oil to splatter during frying. This step is crucial for crispy fried olives.
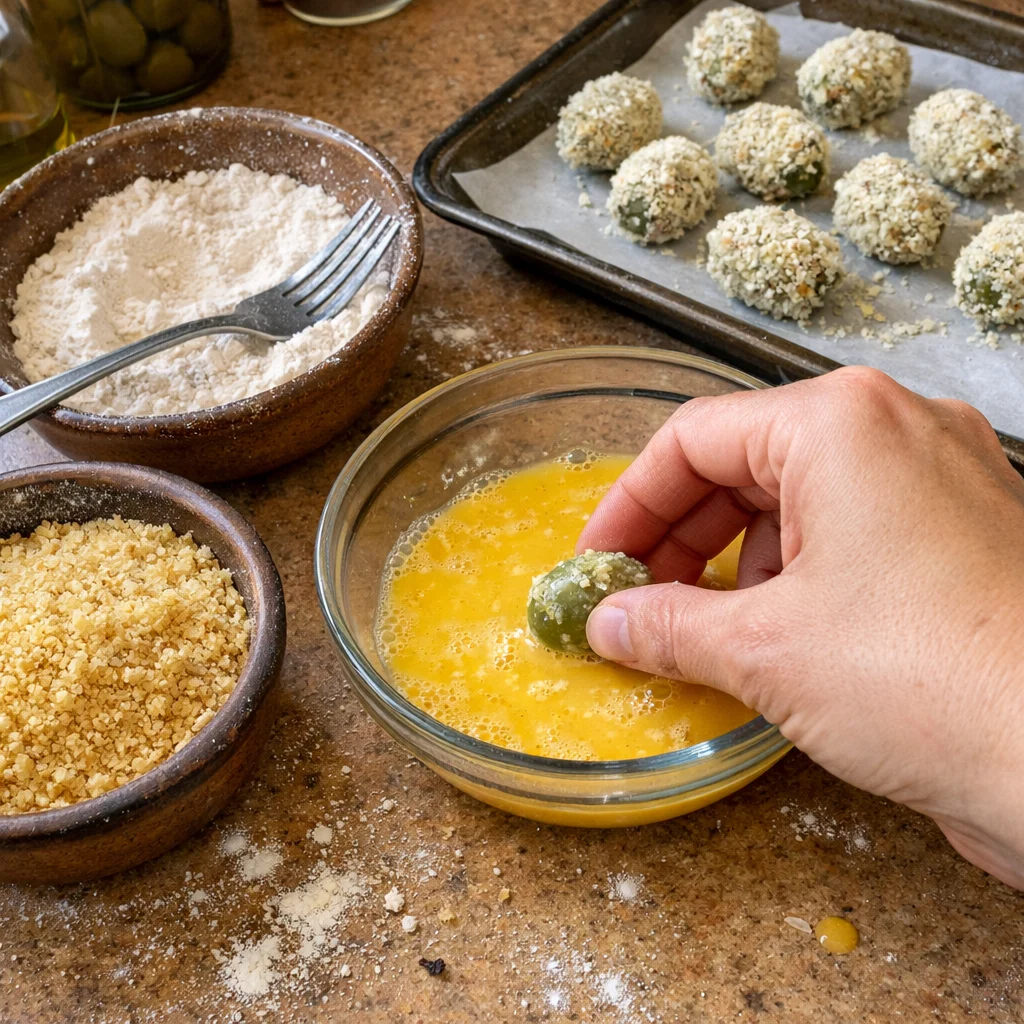
- Set up the Breading Station: Grab three shallow dishes. In the first dish, place the all-purpose flour. In the second, whisk the eggs until smooth. In the third dish, combine the panko breadcrumbs, garlic powder, salt, and pepper. Mix these dry ingredients well. This organized station makes breading efficient.
- Bread the Olives: Take each dried olive and dredge it first in the flour, shaking off any excess. Then, dip it into the beaten egg, allowing any extra to drip off. Finally, roll the olive in the seasoned panko breadcrumbs, pressing gently to ensure a thick, even coating. Place the breaded olives on a clean plate or baking sheet. Complete this for all your olives. A good coating makes for truly crispy fried olives.
- Chill (Optional but Recommended): For the crispiest results, place the breaded olives in the refrigerator for at least 15-20 minutes. This helps the breading adhere better and prevents it from falling off during frying.
- Prepare the Garlic Aioli: While the olives chill, make your aioli. In a small bowl, combine the mayonnaise, minced garlic, fresh lemon juice, and Dijon mustard (if using). Stir everything together until well combined. Taste and adjust seasonings as needed. You want a bright, garlicky flavor to complement the fried olives.
- Heat the Oil: In a medium-sized heavy-bottomed pot or a deep skillet, pour enough vegetable or canola oil to reach about 2 inches deep. Heat the oil over medium-high heat until it reaches 350-375°F (175-190°C). If you don’t have a thermometer, you can test by dropping a small piece of breading into the oil; it should sizzle immediately and turn golden in about 30 seconds.
- Fry the Olives: Carefully lower a few breaded olives into the hot oil, making sure not to overcrowd the pot. Fry them for 2-3 minutes, or until they are golden brown and crispy on all sides. Use a slotted spoon or spider to turn them gently as they fry.
- Drain and Season: Once golden, remove the Crispy Fried Olives from the oil and transfer them to a plate lined with paper towels to drain any excess oil. While still hot, sprinkle them lightly with a little extra salt, if desired.
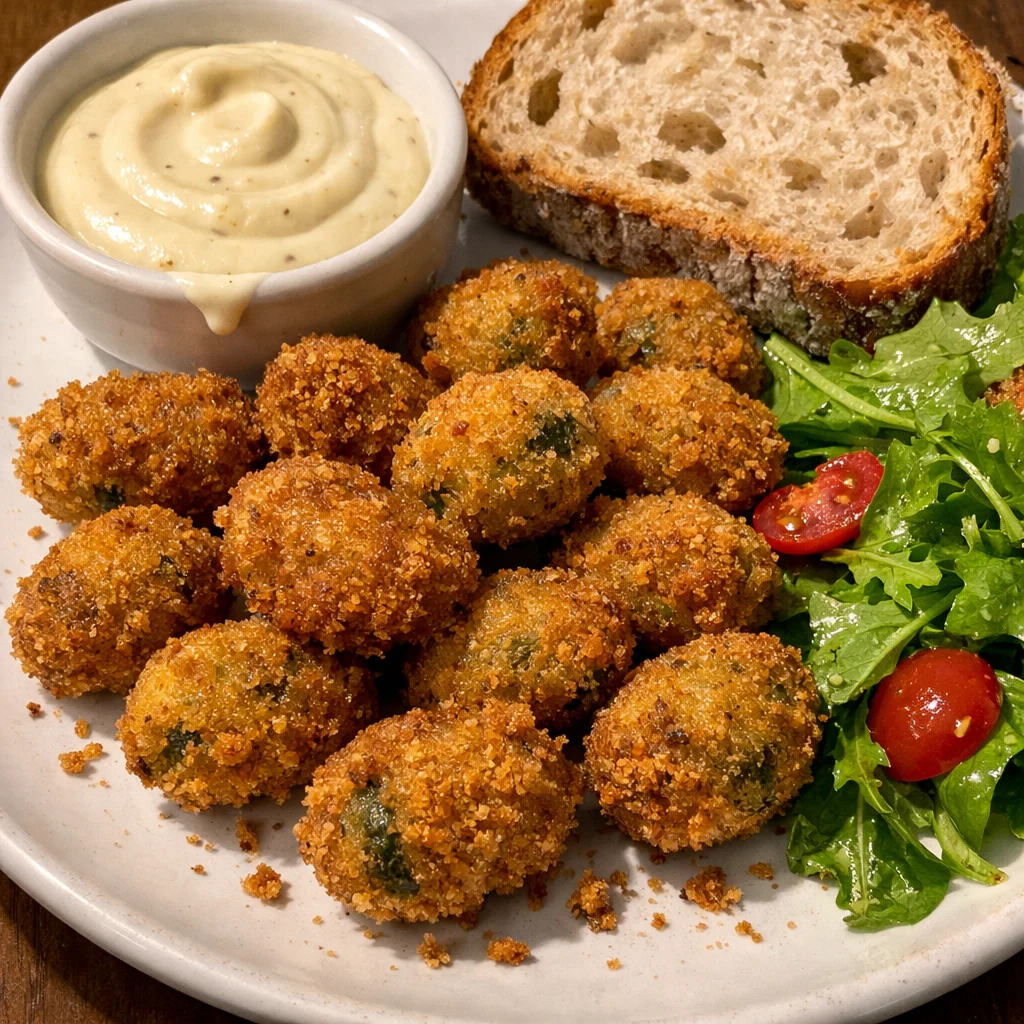
- Serve Immediately: Arrange the hot Crispy Fried Olives on a serving platter. Garnish with fresh chopped parsley, if you like. Serve them immediately with the homemade Garlic Aioli on the side for dipping. Enjoy these absolutely delicious Crispy Fried Olives with Garlic Aioli!
Pro Tips for Success
Achieving perfectly Crispy Fried Olives with Garlic Aioli is all about a few key details. These professional tips will ensure your olives turn out golden, crunchy, and absolutely irresistible every single time. First and foremost, pat your olives DRY.
This cannot be emphasized enough. Excess moisture is the enemy of crispiness and can make your breading soggy or cause oil to splatter. Take the time to individually pat each olive with paper towels after draining them.
This critical step guarantees a superior crust on your fried olives. Secondly, maintain consistent oil temperature. Use a deep-fry thermometer if you have one.
If the oil is too cold, the olives will absorb too much oil and become greasy. If it’s too hot, the breading will burn before the olive inside is properly warmed through. Aim for that sweet spot between 350-375°F (175-190°C). Fry in batches to avoid dropping the oil temperature too much.
Another excellent tip for making these Crispy Fried Olives with Garlic Aioli is to double-dredge for extra crunch. After the first round of breading (flour, egg, panko), you can repeat the egg and panko steps for an even thicker, more resilient, and ultimately crispier coating. This also helps ensure no olive is left un-breaded.
Don’t overcrowd the pot when frying. Give your olives space to cook evenly. Overcrowding drops the oil temperature quickly and leads to uneven browning and greasy results.
Fry in small batches and be patient. Furthermore, for the freshest taste, make your garlic aioli ahead of time. The flavors of the garlic, lemon, and mayonnaise will meld beautifully if allowed to sit in the refrigerator for at least 30 minutes, or even a few hours.
This makes the aioli even more delicious and vibrant when paired with your hot Crispy Fried Olives. Finally, serve immediately. Fried foods are always best fresh out of the oil.
The crispness of these fried olives is truly at its peak right after cooking. Follow these tips, and you will master the art of making the most delicious Crispy Fried Olives with Garlic Aioli.
Mastering the art of crispiness, whether in these fried olives or other dishes, makes a significant difference in the dining experience. Speaking of crispy delights, many enjoy the convenience of a perfectly crunchy sandwich from fast food, and you might wonder How Much Is McDonald’s Crispy Chicken Sandwich? Enjoy Great Taste.
Storage & Reheating Tips
While Crispy Fried Olives with Garlic Aioli are undoubtedly best enjoyed fresh, you can certainly store and reheat them. If you have leftovers, allow the fried olives to cool completely to room temperature before storing. Place them in an airtight container in the refrigerator for up to 2-3 days.
Storing them uncovered initially can help prevent sogginess. The garlic aioli should also be stored separately in an airtight container in the refrigerator for up to 3-4 days. It is crucial to keep the aioli chilled for food safety reasons.
When it comes to reheating your Crispy Fried Olives, avoid the microwave. A microwave will make them soggy, losing all that wonderful crispness. The best method for reheating is in an oven or an air fryer.
Preheat your oven to 350°F (175°C). Place the olives in a single layer on a baking sheet. Reheat for 8-12 minutes, or until they are heated through and the breading feels crispy again.
For an air fryer, preheat to 350°F (175°C) and reheat for 5-7 minutes, shaking the basket halfway through. This will bring back a good amount of the original crispness. Reheating these fried olives properly ensures you still get to enjoy their delicious texture and flavor, especially when dipped in that zesty Garlic Aioli. Even reheated, they remain a fantastic snack, but they won’t be quite as perfectly crispy as when they first emerged from the oil.
What to Serve With This Recipe
These Crispy Fried Olives with Garlic Aioli are incredibly versatile and pair beautifully with a variety of dishes. Their savory, salty, and tangy profile makes them an excellent appetizer or a delightful side. When serving them as a starter, keep the main course relatively light to avoid overwhelming your guests.
Imagine a warm, rustic bread alongside these fried olives, perfect for soaking up any extra aioli. They also make a fantastic addition to a Mediterranean-inspired mezze platter, joining hummus, pita bread, feta cheese, and fresh vegetables.
For a casual dinner, Crispy Fried Olives with Garlic Aioli shine alongside grilled chicken or fish. The brightness of the aioli complements lean proteins wonderfully. You could also serve them as a unique side dish with a simple pasta salad or a fresh green salad with a light vinaigrette.
For a more substantial meal, these fried olives are surprisingly good with juicy burgers or sliders. Their briny kick cuts through the richness of the meat. Don’t forget, they are also phenomenal with a good glass of white wine, like a crisp Sauvignon Blanc, or a chilled dry Rosé, making them perfect for an evening happy hour.
The combination of these Crispy Fried Olives with Garlic Aioli with a sparkling beverage also offers a sophisticated touch. Whether you serve them as a standalone snack or as part of a larger meal, these Crispy Fried Olives with Garlic Aioli will undoubtedly be a memorable highlight.
These fried olives are versatile, making them a perfect starter or side for a wide array of meals. If you’re looking for another crispy centerpiece to complement a light appetizer like these olives, perhaps a perfectly crafted sandwich, you might be interested in learning How to Make a Crispy Chicken Sandwich Perfectly at Home-The Ultimate Guide.
FAQs
How do I make the garlic aioli from scratch?
While my recipe uses a cheats method with mayo, a traditional garlic aioli involves emulsifying egg yolks with olive oil. You need 2 egg yolks, 2 cloves minced garlic, 1 tsp Dijon mustard, 1 tbsp lemon juice, salt, and pepper. Slowly drizzle in 1 cup of neutral oil (like grapeseed or canola) and 1/2 cup extra virgin olive oil while whisking constantly. This creates a rich, authentic aioli for your Crispy Fried Olives.
Can I fry different types of olives?
Absolutely! While green olives are classic, you can experiment. Try large black olives like Kalamata for a fruitier, more intense flavor.
Just ensure all olives are pitted and thoroughly dried before breading. The key for delicious Crispy Fried Olives is dryness.
Are Crispy Fried Olives with Garlic Aioli healthy?
These are more of an indulgence than a health food. Olives offer good fats and antioxidants, but frying adds calories and fat. Enjoy Crispy Fried Olives with Garlic Aioli in moderation as a treat or appetizer. Focus on fresh ingredients and balanced meals overall.
What kind of oil is best for frying olives?
Choose a neutral-flavored oil with a high smoke point. Vegetable oil, canola oil, sunflower oil, or even grapeseed oil work perfectly. These oils allow the flavor of the Crispy Fried Olives to shine through without imparting their own strong taste.
Can I prepare the olives ahead of time?
You can bread the olives a few hours in advance and store them in a single layer on a baking sheet in the refrigerator. This helps the breading adhere better. However, for the best crispness, fry the Crispy Fried Olives just before serving. The aioli can definitely be made a day ahead.
Crispy fried olives, often served as an appetizer, transform simple briny olives into a delightful culinary experience with their crunchy exterior and tender interior. When paired with garlic aioli, a creamy emulsion of garlic, egg yolk, olive oil, and lemon juice, the dish achieves a perfect balance of savory, tangy, and rich flavors, highlighting the ingenuity often found in Mediterranean cuisine.
Nutrition Information (per serving)
Understanding the nutritional content helps you enjoy these delicious Crispy Fried Olives with Garlic Aioli responsibly. Please note that these values are estimates and can vary based on specific ingredient brands, exact quantities used, and cooking methods. We are providing an average estimate for one serving of these tasty fried olives.
| Nutrient | Amount |
|---|---|
| Calories | 280 kcal |
| Total Fat | 25g |
| Saturated Fat | 3g |
| Cholesterol | 35mg |
| Sodium | 580mg |
| Total Carbohydrates | 12g |
| Dietary Fiber | 2g |
| Sugars | 1g |
| Protein | 5g |

Crispy Fried Olives with Garlic Aioli
Ingredients
Method
- Prepare the Olives: Begin by draining your olives thoroughly. Use paper towels to pat them very, very dry. Any excess moisture will prevent the breading from sticking and can cause oil to splatter during frying. This step is crucial for crispy fried olives.
- Set up the Breading Station: Grab three shallow dishes. In the first dish, place the all-purpose flour. In the second, whisk the eggs until smooth. In the third dish, combine the panko breadcrumbs, garlic powder, salt, and pepper. Mix these dry ingredients well. This organized station makes breading efficient.
- Bread the Olives: Take each dried olive and dredge it first in the flour, shaking off any excess. Then, dip it into the beaten egg, allowing any extra to drip off. Finally, roll the olive in the seasoned panko breadcrumbs, pressing gently to ensure a thick, even coating. Place the breaded olives on a clean plate or baking sheet. Complete this for all your olives. A good coating makes for truly crispy fried olives.
- Chill (Optional but Recommended): For the crispiest results, place the breaded olives in the refrigerator for at least 15-20 minutes. This helps the breading adhere better and prevents it from falling off during frying.
- Prepare the Garlic Aioli: While the olives chill, make your aioli. In a small bowl, combine the mayonnaise, minced garlic, fresh lemon juice, and Dijon mustard (if using). Stir everything together until well combined. Taste and adjust seasonings as needed. You want a bright, garlicky flavor to complement the fried olives.
- Heat the Oil: In a medium-sized heavy-bottomed pot or a deep skillet, pour enough vegetable or canola oil to reach about 2 inches deep. Heat the oil over medium-high heat until it reaches 350-375°F (175-190°C). If you don't have a thermometer, you can test by dropping a small piece of breading into the oil; it should sizzle immediately and turn golden in about 30 seconds.
- Fry the Olives: Carefully lower a few breaded olives into the hot oil, making sure not to overcrowd the pot. Fry them for 2-3 minutes, or until they are golden brown and crispy on all sides. Use a slotted spoon or spider to turn them gently as they fry.
- Drain and Season: Once golden, remove the Crispy Fried Olives from the oil and transfer them to a plate lined with paper towels to drain any excess oil. While still hot, sprinkle them lightly with a little extra salt, if desired.
- Serve Immediately: Arrange the hot Crispy Fried Olives on a serving platter. Garnish with fresh chopped parsley, if you like. Serve them immediately with the homemade Garlic Aioli on the side for dipping. Enjoy these absolutely delicious Crispy Fried Olives with Garlic Aioli!