Ingredients
Method
- Prepare the Chicken: First, take your boneless, skinless chicken breasts. Place them between two pieces of plastic wrap. Using a meat mallet or a heavy rolling pin, pound them to an even ½-inch thickness. This ensures even cooking and tender results. Pat them completely dry with paper towels.
- Brine the Chicken (Optional but Recommended): In a shallow dish or a zip-top bag, place the pounded chicken. Pour the buttermilk over the chicken, ensuring it's fully submerged. Cover the dish or seal the bag. Refrigerate for at least 30 minutes, or up to 4 hours. This step significantly tenderizes the chicken and infuses flavor, making your sandwich truly stand out against any fast-food competitor.
- Mix the Dry Coating: While the chicken brines, prepare your breading. In a separate shallow dish, combine the all-purpose flour, cornstarch, smoked paprika, garlic powder, onion powder, cayenne pepper, salt, and black pepper. Whisk thoroughly until all the spices are evenly distributed throughout the flour. This perfectly seasoned coating is key to a flavorful chicken that beats any ordinary Wendy's Crispy Chicken Sandwich.
- Coat the Chicken: Remove the chicken from the buttermilk, allowing any excess to drip off. Do not rinse the chicken. Dredge each piece of chicken generously in the seasoned flour mixture. Press the flour mixture onto the chicken to ensure a thick, even coat. Place the coated chicken on a clean plate or wire rack. Let it sit for 5-10 minutes. This helps the coating adhere better during cooking, leading to a crispier finish.
- Heat the Oil: Pour about 2-3 cups of vegetable or canola oil into a large, heavy-bottomed skillet or Dutch oven. You need enough oil to come about ½-inch up the sides of the pan. Heat the oil over medium-high heat until it reaches 350-375°F (175-190°C). If you don't have a thermometer, a small pinch of flour should sizzle immediately upon contact with the hot oil.
- Fry the Chicken: Carefully place two pieces of coated chicken into the hot oil. Avoid overcrowding the pan; work in batches if necessary. Fry for 4-6 minutes per side, or until the chicken is golden brown, crispy, and cooked through (internal temperature reaches 165°F/74°C). The cooking time will vary depending on the thickness of your chicken. This method ensures a far superior crispiness and flavor compared to the standard Wendy's Crispy Chicken Sandwich.
- Drain and Rest: Once cooked, transfer the crispy chicken pieces to a wire rack set over a baking sheet. This allows excess oil to drain off and helps maintain crispiness. Lightly sprinkle with a little extra salt while hot. This crucial step helps keep your chicken from getting soggy, avoiding the common pitfalls of fast-food options.
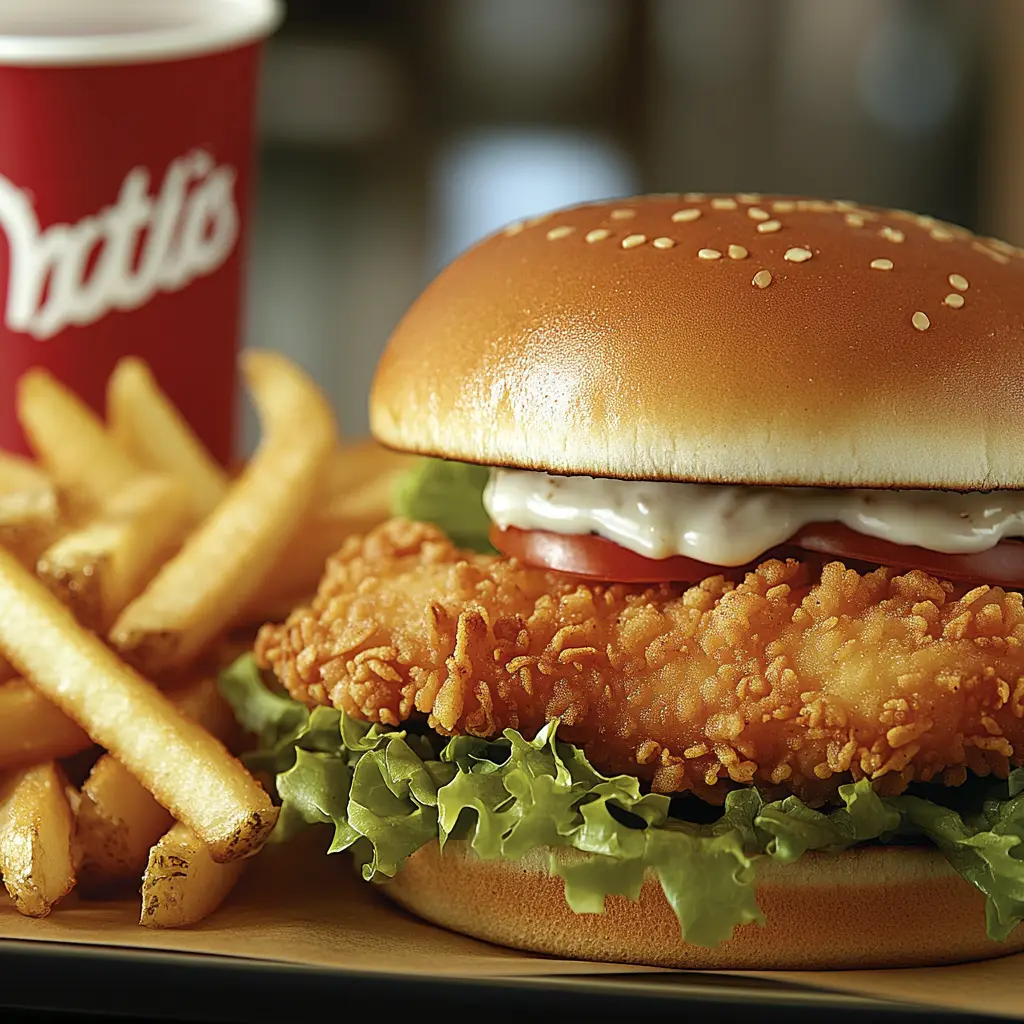
- Prepare the Buns and Toppings: While the chicken rests, lightly toast your hamburger buns. Spread mayonnaise or your preferred sauce generously on both halves of the bun. Layer with crisp lettuce leaves and plenty of pickle slices.
- Assemble and Serve: Place a perfectly crispy chicken breast onto the bottom bun. Top with the prepared top bun. Serve immediately and enjoy your superior homemade creation. This delicious sandwich will make you forget all about How Many Calories Are in a Wendy’s Crispy Chicken Sandwich? Shocking Facts because you've made a healthier, tastier version yourself!
Notes
Pound Your Chicken Evenly: This is crucial. Evenly pounded chicken cooks at the same rate, preventing one part from drying out while another is still undercooked. It also creates a larger surface area for that delicious crispy coating.
The Buttermilk Brine is Gold: Don't skip the buttermilk brine! The acidity in the buttermilk tenderizes the chicken beautifully, and the milk proteins help the breading adhere better. It's a game-changer for moisture and flavor, something you simply can't guarantee with a standard Wendy's Crispy Chicken Sandwich.
Double Dredge for Extra Crisp: For an ultra-crispy crust, consider a double dredge. After the first coat of flour, dip the chicken back into the buttermilk (or a whisked egg if you skipped the brine) and then into the flour mixture again. This builds a thicker, more textured coating.
Let the Breading Rest: After coating the chicken, let it rest on a wire rack for 5-10 minutes. This allows the moisture from the chicken to fully adhere to the flour, creating a more stable crust that won't fall off during frying. This is a common secret for avoiding soggy breading.
Monitor Oil Temperature: Use a thermometer if you have one. Aim for 350-375°F (175-190°C). If the oil is too cool, the chicken will absorb too much oil and become greasy. If it's too hot, the coating will burn before the chicken cooks through. Maintaining the right temperature ensures perfect crispiness without excessive oil absorption, which contributes to those "shocking facts" about calories in a Wendy's Crispy Chicken Sandwich.
Don't Overcrowd the Pan: Fry chicken in batches. Overcrowding drops the oil temperature significantly, leading to soggy, oily chicken. Give each piece space to sizzle and crisp up beautifully.
Drain on a Wire Rack: Never drain fried chicken on paper towels. Paper towels trap steam and moisture, making the crust soggy. A wire rack allows air to circulate, keeping that amazing crispiness intact. A little sprinkle of salt right after draining enhances the flavor.
Toast Your Buns: This seemingly small step makes a huge difference. Toasted buns add texture, prevent sogginess from sauces, and provide a lovely warmth that enhances the entire sandwich experience.
Customize Your Sauce: Don't settle for bland mayo. Mix in a little hot sauce, smoked paprika, garlic powder, or a touch of honey mustard. A homemade sauce elevates the sandwich and lets you control the calorie count more effectively, making it a smarter choice than simply relying on fast-food condiments.
Storing Cooked Chicken: Allow any leftover cooked chicken to cool completely to room temperature. This is crucial to prevent condensation, which can make the chicken soggy. Once cool, transfer the chicken pieces to an airtight container. You can also wrap individual pieces in plastic wrap before placing them in the container. Store in the refrigerator for up to 3-4 days. Do not store assembled sandwiches; the bun and toppings will become soggy.
Storing Breaded, Uncooked Chicken: If you have extra breaded chicken that hasn't been cooked, you can store it raw. Place the breaded chicken on a parchment-lined baking sheet, making sure pieces don't touch. Freeze for about 30-60 minutes until firm. Then, transfer the frozen pieces to a freezer-safe zip-top bag or airtight container. Freeze for up to 1 month. Cook directly from frozen, adding a few minutes to the cooking time.
Reheating for Crispiness: To bring back that glorious crisp, avoid the microwave! Oven Method: Preheat your oven to 375°F (190°C). Place the chicken pieces on a wire rack set over a baking sheet. Heat for 10-15 minutes, or until heated through and crispy. Air Fryer Method: This is my favorite for reheating! Preheat your air fryer to 350°F (175°C). Place the chicken in a single layer in the air fryer basket. Cook for 5-8 minutes, flipping halfway, until hot and re-crisped. Skillet Method: You can also reheat in a dry, non-stick skillet over medium heat for 2-3 minutes per side until hot and crispy.
Reheating Buns and Toppings: Always reheat chicken separately from buns and toppings. Freshly toast buns before serving, and add fresh lettuce and pickles for the best texture and flavor.