Cherries in the Snow Dessert has been a favorite sweet treat for generations, and it’s easy to see why. This no-bake dessert brings together soft cake, creamy layers, and bright cherry topping in one easy, crowd-pleasing dish. In this article, we’ll walk through what makes Cherries in the Snow Dessert so special, explore its ingredients, break down step-by-step instructions, and share expert tips that help you make it perfectly every time. Before long, you’ll feel confident serving this nostalgic, cherry-topped dessert at holidays, potlucks, and family gatherings.
What Is Cherries in the Snow Dessert?
Origins and Classic Appeal of Cherries in the Snow Dessert
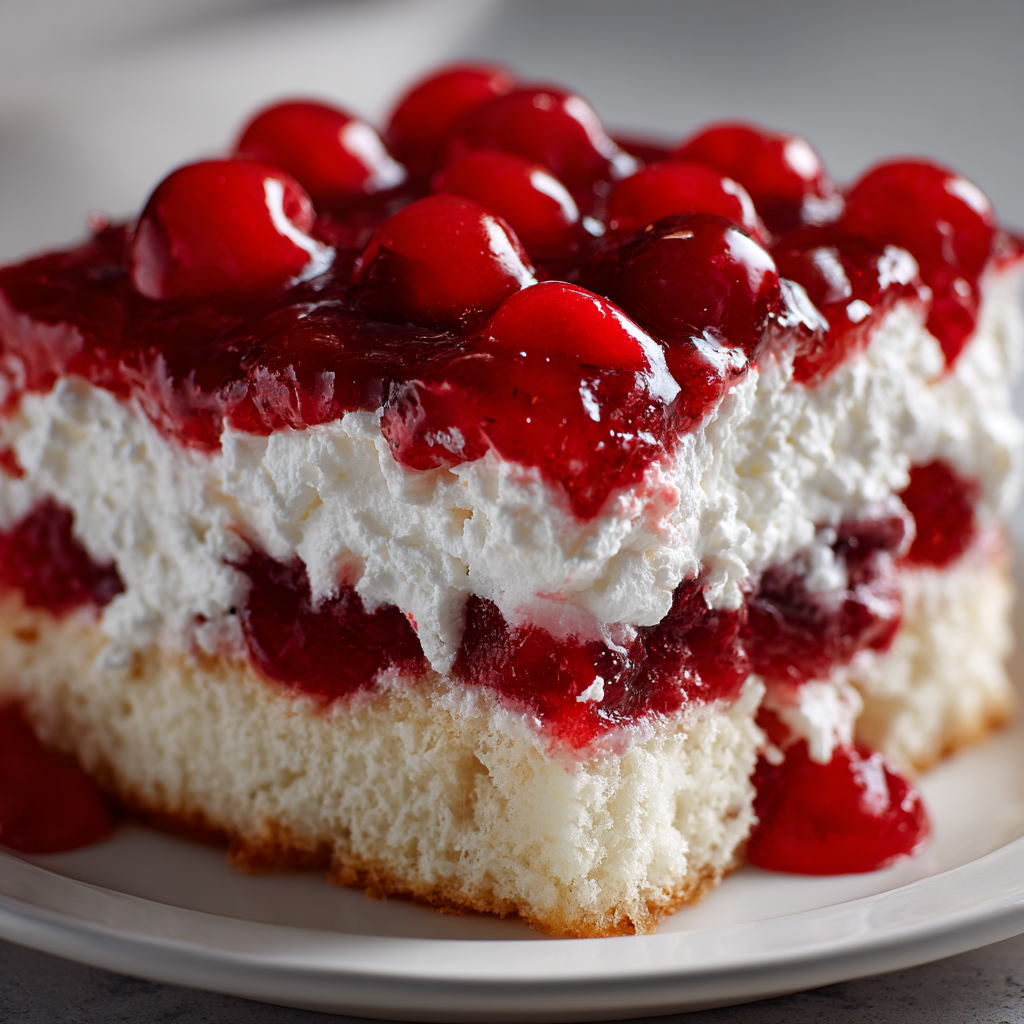
Cherries in the Snow Dessert is a vintage, American no-bake recipe that became popular in home kitchens during the mid-20th century. Because many households wanted quick, affordable desserts that looked impressive without needing an oven, this sweet cherry-topped recipe became a staple. The name “Cherries in the Snow” refers to the bold contrast of bright red cherry pie filling against the fluffy, snow-white cream layer. Although many no-bake desserts have come and gone, this one managed to stay because it’s simple, affordable, and adaptable. The charming appearance and refreshing taste make it a timeless favorite.
Why This No-Bake Dessert Remains Popular Today
Even today, Cherries in the Snow Dessert continues to shine because it checks every box dessert lovers want. It’s easy to prepare, requires very little equipment, and tastes like a blend of cake, cheesecake, and trifle all in one. Because it uses basic ingredients angel food cake, cream cheese, whipped topping, and cherries most people can put it together without a trip to a specialty store. Furthermore, the dessert chills beautifully, making it a great choice for warm months or busy schedules. Whether you’re hosting a holiday dinner, bringing a dish to a potluck, or just craving a creamy treat, this dessert always delivers.
Key Ingredients for Cherries in the Snow Dessert
Essential Components: Cake, Cream Layer, and Cherry Topping
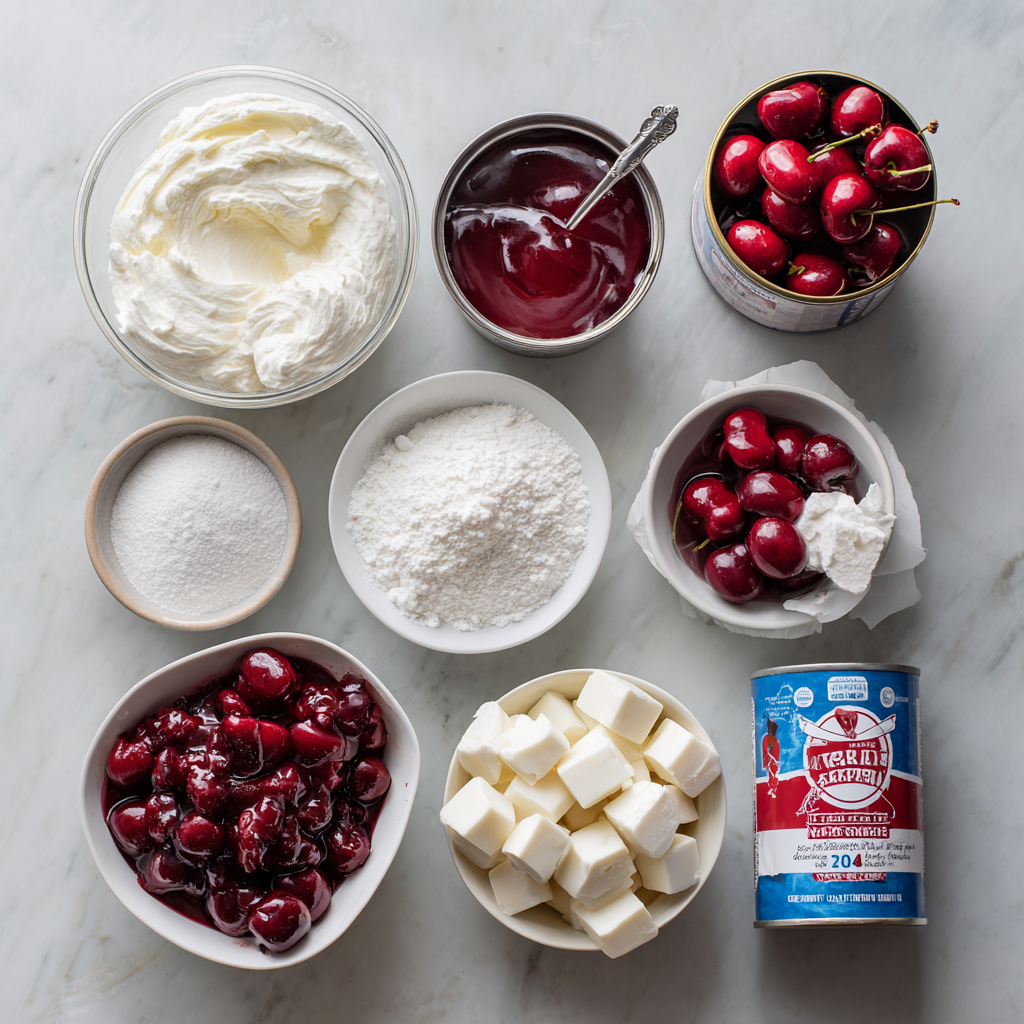
Cherries in the Snow Dessert may look impressive, yet the ingredient list stays wonderfully simple. At its core, this classic treat relies on three layers that work together to create its signature taste and texture. First, the base usually starts with angel food cake, since it offers a soft, airy structure that absorbs the creamy filling without becoming heavy. While some desserts depend on dense cakes or biscuit crusts, this one uses cake cubes that hold up well during chilling.
The middle layer, which many people consider the heart of the dessert, combines cream cheese, powdered sugar, milk, and whipped topping. This mixture comes together quickly and adds a smooth, velvety texture that contrasts beautifully with the fluffy cake beneath it. The final layer is a generous topping of cherry pie filling, which brings both color and sweetness to the dish. Because these ingredients blend so easily, you get a dessert that feels rich without being overwhelming.
Ingredient Variations to Enhance Flavor and Texture
Although the traditional recipe tastes delicious as-is, many home cooks enjoy adding flavor twists to make their Cherries in the Snow Dessert uniquely their own. For example, adding vanilla or almond extract to the cream layer can deepen the overall flavor and give the dessert a more homemade feel. If you prefer a slightly tangier cream base, you can swap part of the milk for Greek yogurt.
You can also experiment with the cake layer. While angel food cake stays the classic choice, you can replace it with sponge cake, pound cake, or even a light white cake. These alternatives add different levels of sweetness and density, allowing you to adjust the dessert depending on your preference. For the topping, cherry remains the signature flavor, but variations like blueberry, raspberry, or strawberry pie filling can change the experience while keeping the dessert easy and no-bake. These small adjustments help you tailor the dessert to any season, event, or taste preference without losing the charm of the original recipe.
Step-by-Step Guide to Make Cherries in the Snow Dessert
Preparing the Cake Layer Properly for Best Texture
To create the perfect base for your Cherries in the Snow Dessert, you’ll want to start with the right cake texture. Angel food cake remains the top choice because it’s light enough to absorb the creamy filling without turning soggy. Begin by cutting or tearing the cake into small, even cubes. While it may seem easier to slice it neatly, pulling it apart by hand often helps the cake pieces keep their airy structure. After prepping the cubes, spread them across the bottom of a 9×13-inch dish, making sure the layer is even. This helps the cream layer settle smoothly over the top, allowing the flavors to blend beautifully as the dessert chills.
Whipping Up the Smooth Cream Cheese Layer
The cream cheese layer is where the magic happens, so paying attention to texture makes a big difference. Start by beating softened cream cheese until it becomes smooth and lump-free. Because cream cheese forms the foundation of the creamy middle layer, proper mixing ensures a silky finish. Gradually add powdered sugar and milk, then continue mixing until everything blends evenly. Once the mixture looks creamy, gently fold in the whipped topping. This step needs a light hand; folding instead of stirring keeps the mixture fluffy, helping the dessert maintain its signature cloud-like feel. Although simple, this creamy layer delivers rich flavor and keeps the dessert balanced.
Assembling and Chilling the Dessert for Perfect Results
Once you’ve prepared each component, assembling the dessert is fast and straightforward. Start by spreading the cream cheese mixture over the cake layer. Try to coat all the cake cubes so every bite includes a blend of textures. After smoothing the cream mixture, spoon the cherry pie filling across the top. Because the cherry layer is heavier than the cream, avoid pressing it too firmly. Instead, gently spread it until the entire surface is covered. When the layers are complete, refrigerate the dessert for at least two hours. Chilling allows the flavors to meld and the layers to firm up. As a result, the Cherries in the Snow Dessert cuts cleanly and tastes even better after resting in the fridge.
Why Cherries in the Snow Dessert Is a Crowd Favorite
Visual Appeal and Festive Presentation Ideas
One of the biggest reasons Cherries in the Snow Dessert continues to win people over is its stunning appearance. The bold red cherry topping stands out beautifully against the creamy white middle layer, giving the dish its “snowy” name. Because the colors are so striking, this dessert fits almost any celebration. It looks festive during the holidays, bright and cheerful for summer picnics, and elegant enough for dinner parties.
Although it’s traditionally served in a simple 9×13-inch dish, you can easily elevate its presentation. Many people layer it in a clear trifle bowl so the cake, cream, and cherry layers remain visible from every angle. Others love creating individual servings in small mason jars, cocktail glasses, or dessert cups. These small choices add charm and make the dessert look more sophisticated without requiring extra effort. With such a flexible presentation style, it’s no surprise this dessert shows up everywhere—from casual potlucks to special family gatherings.
Taste Profile: Creamy, Sweet, and Perfectly Balanced
While the visual appeal grabs attention, the flavor seals the deal. Cherries in the Snow Dessert blends light, airy cake with a cool, creamy middle layer and a juicy, sweet cherry topping. The combination gives you richness without heaviness, creating a dessert that feels indulgent yet refreshing. The cream cheese mixture adds a slight tang that balances the sweetness of the cherries, while the angel food cake adds just enough structure without making the dessert feel dense.
Even though the recipe is simple, the flavor layers come together in a way that keeps people reaching for seconds. Every bite includes soft cake, smooth cream, and bright cherries, making it ideal for just about anyone kids, adults, and even picky eaters. Because the dessert chills before serving, the flavors continue to develop, giving it that classic “tastes even better the next day” quality that people love. When you combine ease, appearance, and flavor, it becomes clear why this dessert has stood the test of time.
Delicious Variations of Cherries in the Snow Dessert
Berry Alternatives: Strawberry, Blueberry, and Raspberry Snow Desserts
Although the classic Cherries in the Snow Dessert remains a household favorite, many home cooks enjoy adding a twist by swapping the cherry topping with other fruity flavors. Because the base and cream layer are neutral and adaptable, this dessert works beautifully with a wide range of pie fillings. For instance, strawberry pie filling brings a bright, summery sweetness that pairs especially well with the fluffy angel food cake. On the other hand, blueberry topping adds a rich, deep berry flavor and a bold color that looks just as striking as the original cherry version.
If you want a slightly tangier option, raspberry pie filling creates a delicious balance of sweet and tart. These berry variations allow you to tailor the dessert to any season or occasion. Although the name might change like “Strawberries in the Snow” or “Blueberries in the Snow” the process stays exactly the same. Because the dessert is so simple, experimenting with different fruit toppings takes very little effort while still giving you impressive results.
Using Different Cake Bases: Pound Cake, Sponge Cake, or White Cake
Even though angel food cake is the classic foundation for Cherries in the Snow Dessert, you can explore other cake types to alter the texture and richness. For example, pound cake offers a denser, buttery base that creates a more indulgent version of the dessert. When paired with the creamy middle layer, it gives each bite a slightly richer feel. Alternatively, sponge cake keeps the dessert light and airy while offering a hint of sweetness that blends naturally with the cream cheese mixture.
If you prefer something in between, a simple white cake works beautifully. It adds stability without being too heavy and holds up well underneath the cream layer. No matter which base you choose, the cream and fruit topping adapt easily. These cake variations help you customize the dessert to fit your event whether you want something elegant, casual, extra sweet, or refreshingly light. Because the recipe remains flexible, it encourages creativity while keeping the signature no-bake convenience that everyone loves.
Tips, Tricks, and Expert Techniques
How to Prevent a Runny Cream Layer
Even though Cherries in the Snow Dessert is simple to prepare, many people struggle with a cream layer that turns out too soft. Fortunately, preventing a runny filling is easy once you understand a few key tricks. First, make sure your cream cheese is softened but not melted. If it’s too warm, the mixture becomes thin and loses its structure. Next, always beat the cream cheese until smooth before adding the powdered sugar. This helps the mixture thicken evenly and avoids lumps that can affect the final texture.
Another helpful tip is to fold in the whipped topping gently. If you stir it too aggressively, the air in the whipped topping collapses, leaving the cream layer looser than intended. Additionally, using whole milk instead of skim provides a slightly thicker consistency. After assembling your layers, refrigerate the dessert long enough for everything to firm up usually at least two hours. These small steps help ensure the cream layer stays fluffy, stable, and perfectly spoonable.
Best Ways to Store and Serve the Dessert
Because this dessert relies on cool, creamy layers, proper storage plays a big role in keeping it fresh. Always cover the dish tightly with plastic wrap or a fitted lid before placing it in the refrigerator. This prevents the cream layer from drying out and keeps the cherry topping glossy. Although the dessert holds well for up to two or three days, it tastes best when served within the first 24 hours.
When you’re ready to serve, use a wide, flat spatula to lift each slice cleanly, especially if you want the layers to remain visible. Cherries in the Snow Dessert tastes best when served cold, so avoid letting it sit out at room temperature for long periods. If you’re planning to take it to a potluck or gathering, place the dish in a cooler with ice packs to maintain its chilled texture. With these tips, your dessert will stay fresh, flavorful, and picture-perfect from the first bite to the last.
Make-Ahead & Storage Guide for Cherries in the Snow Dessert
How Long It Keeps in the Fridge & Best Storage Containers
One of the biggest perks of Cherries in the Snow Dessert is that it works extremely well as a make-ahead recipe. In fact, allowing it to chill longer actually improves both the texture and the flavor. Generally, the dessert stays fresh in the refrigerator for 2–3 days, although many people notice that the first 24 hours deliver the best overall consistency. Because the cream layer is soft and airy, storing the dessert in the right type of container matters more than most people realize.
For the best results, cover your dish tightly with plastic wrap, a fitted lid, or a reusable airtight cover. This prevents the cream layer from absorbing odors from the fridge and keeps the cherry topping from becoming dry. If you’ve prepared individual servings in jars or cups, simply screw on the lids or add tight-fitting covers. These containers keep the dessert fresh while also making it easier to grab a quick serving whenever you want. Although the cherry topping holds up well, the cake layer will gradually soften over time, so eating the dessert within a couple of days provides the best experience.
Freezing Instructions and Thawing Tips
While not everyone realizes it, Cherries in the Snow Dessert can be frozen with surprisingly good results, as long as you follow a few simple guidelines. To begin, assemble the dessert as you normally would, but avoid placing it in the freezer while it’s still warm from mixing. After the layers have chilled for at least an hour, cover the dish tightly with both plastic wrap and aluminum foil. This double layer helps protect the cream and cherry topping from freezer burn. You can store the dessert in the freezer for up to one month, although the texture is best if eaten within two weeks.
When you’re ready to thaw it, move the dessert to the refrigerator and allow it to defrost slowly for several hours. Avoid thawing it at room temperature because the cream layer can soften too quickly and lose its structure. Once thawed, the dessert may appear slightly softer than the fresh version, but the flavor remains delicious. Although freezing isn’t necessary for short-term storage, it’s a helpful option when preparing desserts ahead of a big holiday or event. With these tips, you can make Cherries in the Snow Dessert well in advance without sacrificing flavor or texture.
Recipe Card: Cherries in the Snow Dessert
Full Ingredient List with Exact Measurements
To help you make this Cherries in the Snow Dessert with confidence, here’s a complete list of ingredients used in this classic no-bake treat. These portions create a generous 9×13-inch pan, perfect for family gatherings, potlucks, or holiday celebrations.
Cake Layer
To make portion planning easier, here’s a quick overview:
Component
Quantity
Notes
Angel food cake
1 whole cake
Cut or tear into cubes
Cream cheese
8 oz
Softened for smooth mixing
Milk
1 cup
Whole milk adds richness
Whipped topping
8 oz
Fold gently for fluffiness
Cherry pie filling
2 cans
21 ounces each
These ingredients come together quickly and allow you to build a dessert that looks beautiful and tastes even better.
Step-by-Step Instructions for Beginners
Even if you’re new to no-bake desserts, you can make this recipe without any difficulty. Because the steps are simple and the ingredients work well together, the dessert turns out consistently delicious every time.
Prepare the Cake Layer
Start by cutting the angel food cake into small pieces. Spread the cubes evenly across the bottom of a 9×13-inch dish. This layer forms the base that absorbs the creamy filling.
Mix the Cream Layer
Beat the softened cream cheese until smooth. Add powdered sugar and milk, then continue mixing until the mixture becomes creamy. Gently fold in the whipped topping to keep the texture light and fluffy. Spread this mixture evenly over the cake layer.
Add the Cherry Topping
Spoon both cans of cherry pie filling over the cream layer. Spread it carefully so the topping covers the surface without pressing down too hard.
Chill the Dessert
Refrigerate the dish for at least two hours before serving. This helps the layers set and gives the flavors time to blend.
Serve and Enjoy
Cut into squares or scoop with a spoon. Always serve chilled for the best taste and texture.
Because the steps are straightforward, this dessert is great for beginners, busy families, or anyone looking for a quick and impressive treat.
FAQs About Cherries in the Snow Dessert
Can I make Cherries in the Snow Dessert a day ahead?
Yes, you can absolutely make Cherries in the Snow Dessert a full day ahead. In fact, preparing it early often improves the texture because the cake absorbs some of the cream layer, allowing all the flavors to blend. Just be sure to cover the dish tightly and refrigerate it until serving time.
What type of cake works best for this dessert?
Angel food cake remains the classic choice because it keeps the dessert light and airy. However, you can also use sponge cake, white cake, or even pound cake if you prefer something richer. Each option changes the final texture slightly, but all work well with the creamy filling and cherry topping.
Can I use homemade whipped cream instead of Cool Whip?
Yes, homemade whipped cream works beautifully. Just make sure it’s whipped to medium stiffness so it folds smoothly into the cream cheese mixture. Because homemade whipped cream is less stable than Cool Whip, you may want to serve the dessert within 24 hours for the best results.
Can I substitute the cherry pie filling with another fruit?
Absolutely. While cherries give the dessert its signature look, you can switch to blueberry, strawberry, raspberry, or mixed berry pie filling. Each fruit brings its own color and flavor, allowing you to customize the dessert for different seasons or holidays.
How do I keep the cream layer from becoming too soft?
The best way to prevent a runny cream layer is to beat the cream cheese thoroughly before adding the other ingredients. Also, fold the whipped topping gently to keep it airy. Finally, allow enough chilling time at least two hours, but longer is even better.
Can this dessert be frozen?
Yes, you can freeze Cherries in the Snow Dessert for up to one month. For the best results, chill the dessert before freezing, then wrap it tightly in both plastic wrap and aluminum foil. Thaw it slowly in the refrigerator before serving to maintain the best texture.
How long does the dessert last in the fridge?
When stored properly in an airtight container, this dessert stays fresh for two to three days. Although it remains safe to eat for slightly longer, the cake layer may become softer, and the cream may loosen after day three.
Conclusion: Why Cherries in the Snow Dessert Belongs in Every Kitchen
Cherries in the Snow Dessert has earned its place as a timeless favorite because it brings together everything people love in a homemade treat. It’s simple to assemble, delightfully creamy, and full of bright cherry flavor that instantly catches the eye. Although the recipe requires only a handful of ingredients, it delivers a layered experience that feels special without demanding hours in the kitchen. Because it’s a no-bake dessert, it works well for busy families, new cooks, holiday hosts, and anyone wanting a dependable recipe that tastes great every single time.
Although many desserts come and go, this one remains popular because it adapts so easily. Whether you change the topping, switch the cake layer, or make it ahead for a big event, the result stays consistently delicious. The combination of soft cake, smooth cream, and juicy cherries never disappoints. If you’re looking for a dessert that feels nostalgic yet modern, simple yet impressive, Cherries in the Snow Dessert is the perfect choice to add to your regular rotation.
Lorem ipsum dolor sit amet, consectetur adipiscing elit. Ut elit tellus, luctus nec ullamcorper mattis, pulvinar dapibus leo.

 Because this dessert relies on cool, creamy layers, proper storage plays a big role in keeping it fresh. Always cover the dish tightly with plastic wrap or a fitted lid before placing it in the refrigerator. This prevents the cream layer from drying out and keeps the cherry topping glossy. Although the dessert holds well for up to two or three days, it tastes best when served within the first 24 hours.
When you’re ready to serve, use a wide, flat spatula to lift each slice cleanly, especially if you want the layers to remain visible. Cherries in the Snow Dessert tastes best when served cold, so avoid letting it sit out at room temperature for long periods. If you’re planning to take it to a potluck or gathering, place the dish in a cooler with ice packs to maintain its chilled texture. With these tips, your dessert will stay fresh, flavorful, and picture-perfect from the first bite to the last.
Because this dessert relies on cool, creamy layers, proper storage plays a big role in keeping it fresh. Always cover the dish tightly with plastic wrap or a fitted lid before placing it in the refrigerator. This prevents the cream layer from drying out and keeps the cherry topping glossy. Although the dessert holds well for up to two or three days, it tastes best when served within the first 24 hours.
When you’re ready to serve, use a wide, flat spatula to lift each slice cleanly, especially if you want the layers to remain visible. Cherries in the Snow Dessert tastes best when served cold, so avoid letting it sit out at room temperature for long periods. If you’re planning to take it to a potluck or gathering, place the dish in a cooler with ice packs to maintain its chilled texture. With these tips, your dessert will stay fresh, flavorful, and picture-perfect from the first bite to the last.