
That first Saturday morning, when the sun peeked through the kitchen window, casting a warm glow on our worn wooden table, I knew it. The smell of something truly special filled the air. My three little ones, usually slow to rise, were already gathered, their eyes wide with anticipation.
That was the day I perfected my recipe for Crispy Waffles. It wasn’t just about a breakfast; it was about creating a memory, a moment of pure joy and simple goodness that my family would cherish. For years, I chased that elusive perfect crunch, the golden exterior giving way to a fluffy interior, a quest for truly delightful Crispy Waffles.
Countless batches came and went, some too soft, others too dense, but this recipe? This one finally delivered the ultimate Crispy Waffles experience, a dish that became an instant family favorite and a beacon of cozy weekend mornings. I believe food is love, and these homemade Crispy Waffles are a true expression of that love, simple to make, incredibly satisfying, and guaranteed to bring smiles all around. Get ready to create your own cherished memories with these incredible Crispy Waffles.
Why You’ll Love This Recipe for Crispy Waffles
You will absolutely adore this recipe for several wonderful reasons. First, these are not just any waffles; these are truly *crispy waffles* – golden, crunchy on the outside, and wonderfully tender inside. That perfect texture makes all the difference!
Moreover, this recipe uses simple, wholesome ingredients you likely already have in your pantry, aligning perfectly with my philosophy of nourishing food. It’s a straightforward process, even for beginner cooks, and yields consistently delicious results every time. Furthermore, making Crispy Waffles from scratch fills your home with the most inviting aroma, creating an atmosphere of warmth and comfort.
Forget those store-bought mixes; these homemade Crispy Waffles elevate breakfast or brunch to an unforgettable experience. Your family will thank you for these delightful, perfectly crispy waffles.
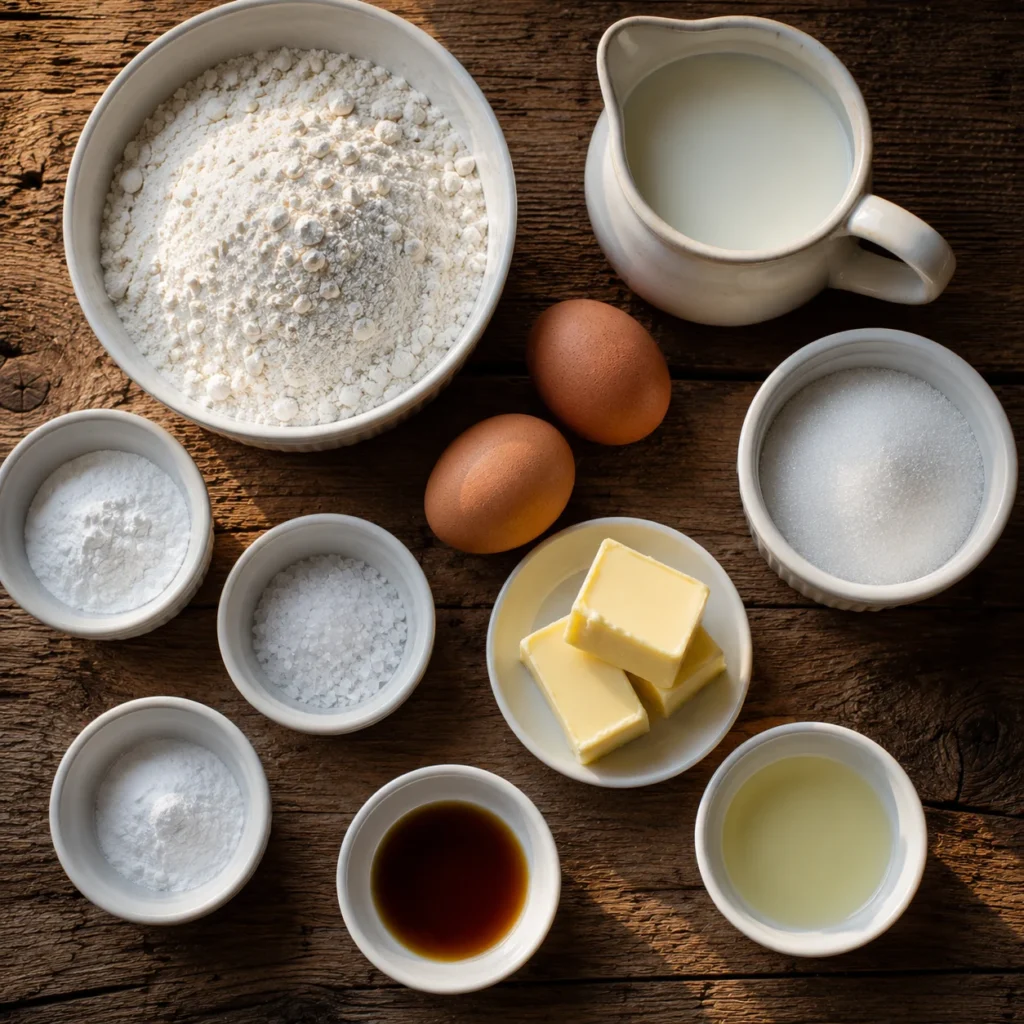
Ingredients You’ll Need
Gathering your ingredients for these amazing Crispy Waffles is simple. You’ll find most of these staples in your kitchen already, ready to transform into a delicious breakfast treat. Freshness always makes a difference, so opt for good quality eggs and dairy.
The precise combination of these ingredients creates the magic behind truly crispy waffles. Make sure to measure accurately for the best results and the most perfect Crispy Waffles.
| Ingredient | Quantity |
|---|---|
| All-purpose flour | 2 cups |
| Granulated sugar | 2 tablespoons |
| Baking powder | 1 tablespoon |
| Baking soda | 1 teaspoon |
| Salt | ½ teaspoon |
| Large eggs | 2 |
| Buttermilk | 1 ½ cups |
| Unsalted butter, melted | ½ cup |
| Vanilla extract | 1 teaspoon |
| Vegetable oil (for greasing waffle iron) | As needed |
Substitutions & Variations
This Crispy Waffles recipe is incredibly versatile, allowing you to tailor it to your dietary needs or simply experiment with new flavors. You can easily make this recipe work for various preferences while still achieving wonderful Crispy Waffles.
* Gluten-Free Waffles: Swap the all-purpose flour for a 1:1 gluten-free baking blend. Ensure your blend contains xanthan gum for the best texture. These still make fantastic crispy waffles.
* Dairy-Free Option: Use a good quality plant-based milk (like almond, soy, or oat milk) instead of buttermilk. To replicate the tang of buttermilk, add 1 tablespoon of apple cider vinegar or lemon juice to your plant milk and let it sit for 5 minutes before adding to the batter. For the melted butter, use a dairy-free butter alternative or neutral oil like melted coconut oil (refined, so it doesn’t impart flavor) or avocado oil.
You can still create delicious crispy waffles this way.
* Egg Substitutions: For an egg-free version, use flax eggs (1 tablespoon ground flaxseed mixed with 3 tablespoons water per egg, let sit for 5 minutes) or a commercial egg replacer. The texture might be slightly different, but you will still get tasty waffles.
* Flavor Boosts:
* Cinnamon Swirl: Add 1 teaspoon of ground cinnamon to the dry ingredients for a warm, comforting twist.
* Lemon Zest: Incorporate 1 tablespoon of fresh lemon zest into the batter for a bright, citrusy note.
* Chocolate Chip Waffles: Fold in ½ cup of mini chocolate chips at the very end of mixing for a sweet treat.
These chocolate chip crispy waffles are a kid favorite!
* Spiced Waffles: A pinch of nutmeg or a dash of pumpkin pie spice can transform these crispy waffles for fall.
* Sweetener Alternatives: You can use maple sugar or coconut sugar in place of granulated sugar, adjusting the amount to your sweetness preference.
* Whole Wheat: Substitute up to half of the all-purpose flour with whole wheat pastry flour for added fiber. The texture will be slightly denser but still delicious, and you can still aim for those amazing crispy waffles.
Just as these waffles offer incredible versatility for dietary needs and flavor experimentation, you might also enjoy exploring other delightful crispy creations. For a unique appetizer that’s sure to impress, consider our recipe for Crispy Fried Olives with Garlic Aioli.
Step-by-Step Instructions
Creating these incredibly Crispy Waffles is a straightforward process. Follow these steps precisely to ensure that perfect golden crunch and fluffy interior. Precision in each step brings you closer to the best Crispy Waffles you’ve ever made.
1. Prepare Your Batter: In a large bowl, whisk together the all-purpose flour, granulated sugar, baking powder, baking soda, and salt. Make sure these dry ingredients are thoroughly combined.
This ensures even leavening throughout your crispy waffles.
2. Combine Wet Ingredients: In a separate medium bowl, whisk the large eggs until lightly beaten.
Then, add the buttermilk, melted unsalted butter, and vanilla extract. Whisk these wet ingredients together until well combined. The buttermilk is key to tender and flavorful crispy waffles.
3. Mix Wet into Dry: Pour the wet ingredient mixture into the dry ingredient mixture. Stir gently with a whisk or spatula until just combined.
A few lumps are perfectly fine; in fact, slight under-mixing helps keep your Crispy Waffles tender. Do not overmix the batter, as this develops gluten and can lead to tough waffles.
4.
Rest the Batter: Let the waffle batter rest for 5-10 minutes. This resting period allows the gluten to relax and the baking powder to activate, contributing significantly to light and airy, yet crispy waffles.
5.
Preheat Waffle Iron: While the batter rests, preheat your waffle iron according to the manufacturer’s instructions. Ensure it reaches its optimal cooking temperature. A properly hot waffle iron is crucial for achieving truly crispy waffles.
6. Grease and Pour: Lightly brush or spray the waffle iron plates with vegetable oil or non-stick spray, even if it’s non-stick. This extra step helps immensely with achieving crispy waffles and prevents sticking.
Pour about ½ to ¾ cup of batter onto the hot waffle iron, depending on your waffle iron’s size. Do not overfill.
7.
Cook to Golden Perfection: Close the waffle iron lid and cook until the waffles are golden brown and crisp. This usually takes 3-5 minutes, but cooking times vary by waffle iron. Resist the urge to open the lid too early, as this can release steam and prevent the Crispy Waffles from fully setting and becoming truly crisp.
8. Serve Immediately: Carefully remove the finished Crispy Waffles with a fork or tongs. Serve them warm with your favorite toppings.
For maximum crispiness, transfer cooked waffles to a wire rack while you cook the remaining batter, preventing them from steaming and softening. Repeat with the remaining batter, ensuring you get several batches of perfect Crispy Waffles.
Pro Tips for Success
Achieving the ultimate Crispy Waffles requires a few extra tricks up your sleeve. These simple tips will elevate your waffle game from good to absolutely outstanding, ensuring every bite delivers that delightful crunch. Mastering these techniques means consistently perfect Crispy Waffles.
* Don’t Overmix the Batter: This is perhaps the most crucial tip for tender waffles. Stir the wet and dry ingredients together just until combined. Lumps are perfectly fine.
Overmixing develops gluten, resulting in tough, chewy waffles, not the light and crispy waffles we’re aiming for.
* Let the Batter Rest: Allow the batter to sit for 5-10 minutes before cooking. This resting period allows the flour to fully hydrate and gives the baking powder a head start, leading to a lighter, airier texture, which is a key component of crispy waffles.
* Hot Waffle Iron is Key: Preheat your waffle iron thoroughly. A properly hot iron immediately seals the outside of the batter, creating that desirable crispy exterior. If your iron isn’t hot enough, the waffles will be soft and pale.
* Don’t Skimp on Butter/Oil: The melted butter in the batter and the oil for greasing the iron both contribute to crispiness. Ensure your butter is fully melted and incorporated, and always grease your iron, even if it’s non-stick, for that extra crunch on your crispy waffles.
* Resist the Urge to Peek: Opening the waffle iron lid too early releases steam, which is essential for creating a crispy crust.
Let the waffle cook completely until the steam significantly reduces or stops, and your indicator light (if you have one) signals it’s done. Patience equals perfect Crispy Waffles.
* Avoid Overfilling: Use the right amount of batter.
Too much will overflow and make a mess, while too little won’t cover the plate evenly. Practice makes perfect here. Most irons take about ½ to ¾ cup of batter for good Crispy Waffles.
* Serve Immediately on a Wire Rack: As soon as you remove a waffle, place it on a wire rack, not a plate. This allows air to circulate around it, preventing steam from accumulating underneath and making the waffle soggy. This step is vital for maintaining the crispiness of your Crispy Waffles as you cook the rest.
* Buttermilk Magic: Don’t skip the buttermilk! Its acidity reacts with the baking soda to create a light, fluffy interior while also adding a subtle tangy flavor that enhances the overall taste of your crispy waffles. If you don’t have buttermilk, remember my substitution tip above.
Mastering the art of crispy textures isn’t limited to waffles; these valuable tips can extend to many other dishes you create at home. If you’re looking to bring that same delightful crunch to your savory meals, learn How to Make Taco Shells: The Ultimate Guide to Homemade Soft & Crispy Tacos.
Storage & Reheating Tips
While these Crispy Waffles are undeniably best enjoyed fresh off the iron, sometimes you have leftovers, or you want to meal prep for busy mornings. Proper storage and reheating ensure you can still enjoy delightful, nearly as crispy waffles later.
* Cool Completely: Before storing, allow any leftover Crispy Waffles to cool completely on a wire rack. Stacking warm waffles will trap steam and make them soggy.
* Storage:
* Short-Term (1-2 days): Store cooled waffles in an airtight container or a resealable plastic bag at room temperature.
They will lose some of their crispness, but you can revive it.
* Long-Term (up to 3 months): For freezing, first, place cooled waffles in a single layer on a baking sheet and freeze for about 30 minutes until solid. This “flash freezing” prevents them from sticking together.
Then, transfer the frozen waffles to a freezer-safe bag or container. This is a great way to always have delicious Crispy Waffles on hand!
* Reheating for Crispiness:
* Toaster Oven/Toaster: This is the absolute best method for reviving crispiness.
Place frozen or refrigerated waffles directly into a toaster or toaster oven. Toast on a medium setting until heated through and golden crispy again. This method truly brings back the Crispy Waffles experience.
* Oven: Preheat your oven to 350°F (175°C). Place frozen or refrigerated waffles directly on a baking sheet in a single layer. Bake for 10-15 minutes, or until hot and crispy.
* Air Fryer: Preheat your air fryer to 350°F (175°C). Place waffles in a single layer in the air fryer basket. Cook for 3-5 minutes for refrigerated, or 5-8 minutes for frozen, checking frequently until hot and crispy.
This is another excellent way to get back those wonderful Crispy Waffles.
* Microwave (Not Recommended for Crispness): While you *can* microwave waffles to heat them, it will result in soft, chewy waffles, not crispy ones. Only use this method if crispiness is not a priority.
What to Serve With This Recipe
These amazing Crispy Waffles are a blank canvas for deliciousness. Whether you crave sweet or savory, there are countless ways to complement their perfect crunch. Here are some of my family’s favorite pairings to enjoy with your glorious Crispy Waffles.
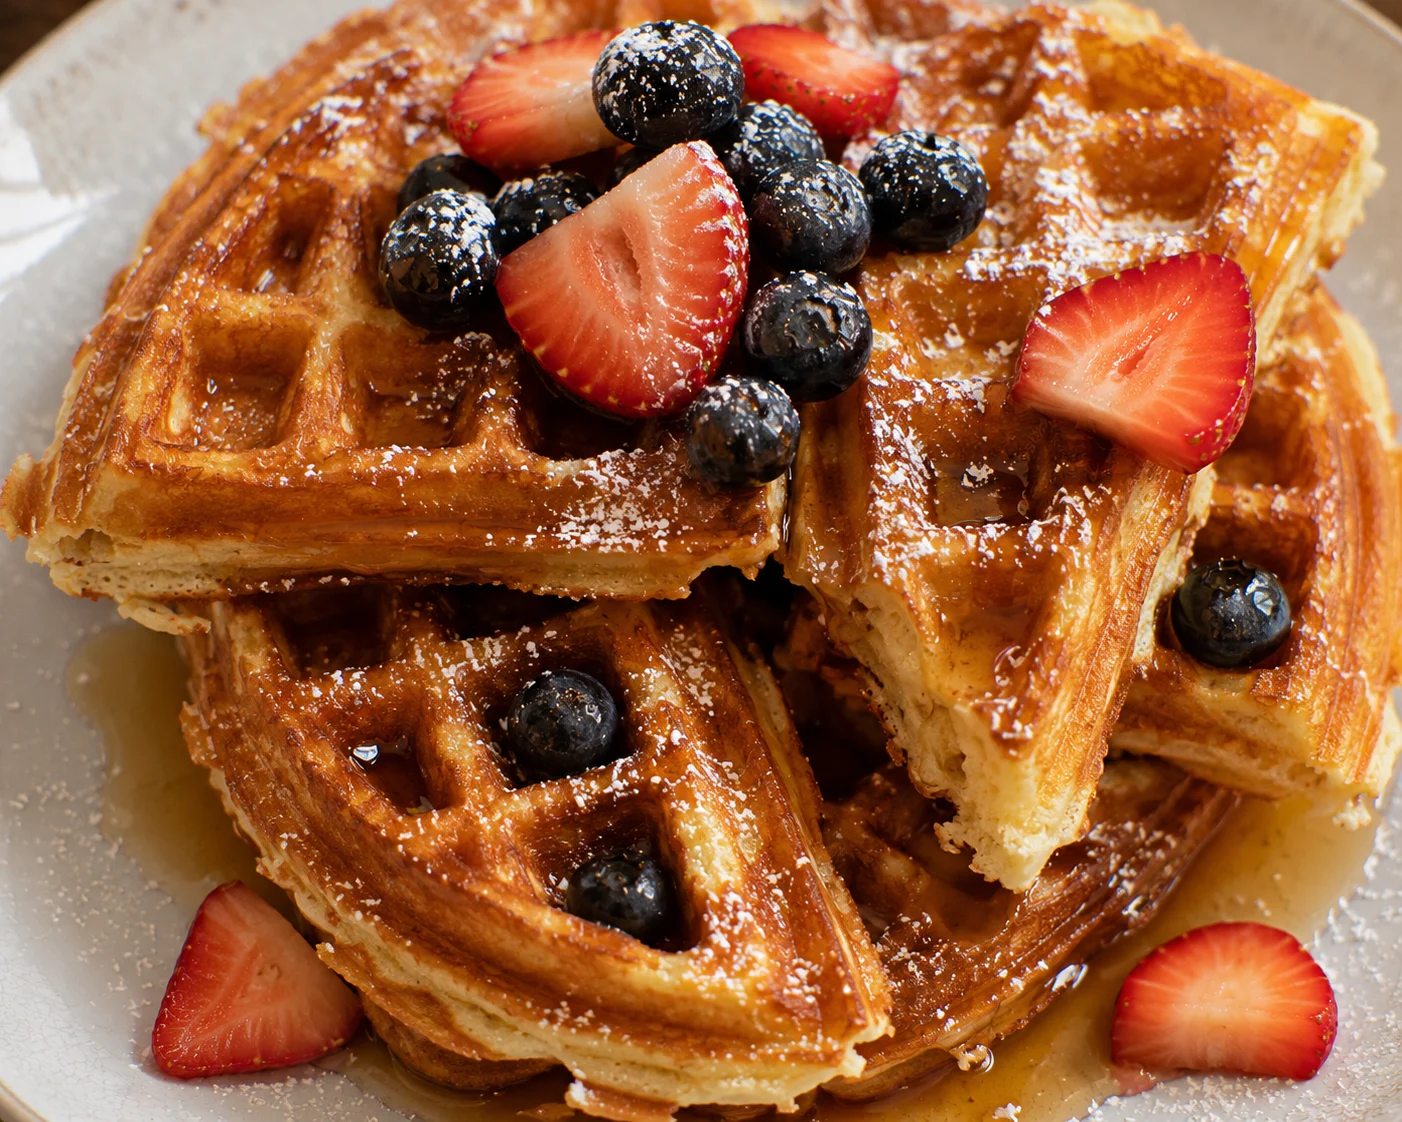
* Classic Sweet Toppings:
* Maple Syrup: A generous drizzle of pure maple syrup is the quintessential topping for Crispy Waffles.
* Fresh Berries: A colorful medley of strawberries, blueberries, raspberries, and blackberries adds freshness and a touch of sweetness.
* Whipped Cream: A dollop of homemade whipped cream makes these Crispy Waffles feel extra indulgent.
* Fruit Compote: Warm berry or apple compote, perhaps with a hint of cinnamon, is a comforting choice.
* Powdered Sugar: A simple dusting of powdered sugar makes for an elegant finish.
* Nutella or Chocolate Sauce: For a truly decadent treat, spread Nutella or drizzle chocolate sauce over your Crispy Waffles.
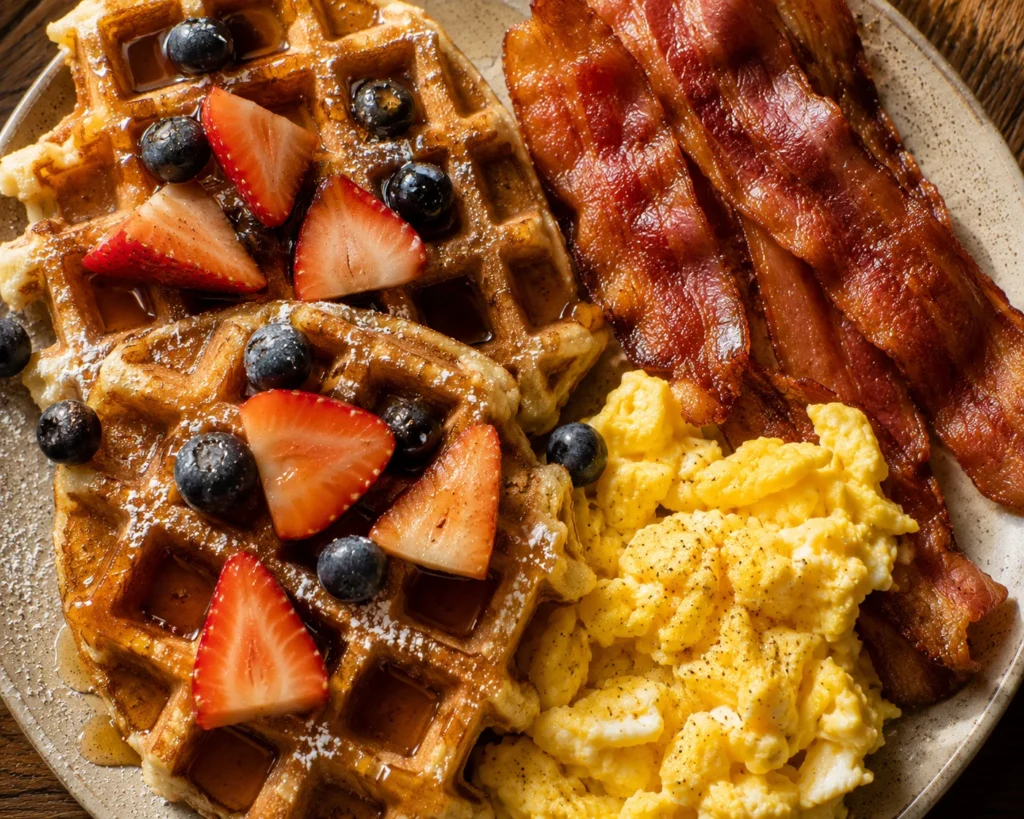
* Savory Pairings:
* Bacon or Sausage: Crispy bacon or savory breakfast sausage provides a wonderful salty contrast to the sweet waffles. The combination of crispy waffles and crispy bacon is unparalleled!
* Fried Chicken: For a Southern-inspired meal, serve your Crispy Waffles with fried chicken and a drizzle of hot honey.
Chicken and waffles are a classic for a reason!
* Scrambled or Fried Eggs: Pair the waffles with your favorite style of eggs for a complete breakfast.
* Breakfast Potatoes: A side of crispy home fries or hash browns complements the meal beautifully.
* Beverages:
* Fresh Orange Juice: A glass of bright, refreshing orange juice is a perfect breakfast accompaniment.
* Coffee or Tea: Your favorite hot beverage always pairs well with a comforting meal of Crispy Waffles.
* Milk: A cold glass of milk for the kids is a simple, nourishing choice.
While these waffles offer a fantastic base for both sweet and savory toppings, the pursuit of perfect crispiness is a culinary journey worth exploring in many forms. For another perspective on satisfying crispy delights, you might be interested in discovering How Much Is McDonald’s Crispy Chicken Sandwich? Enjoy Great Taste.
FAQs
How do I make sure my waffles are truly crispy?
Achieving truly Crispy Waffles relies on several factors. First, ensure your waffle iron is fully preheated to its highest setting. A very hot iron instantly caramelizes the batter’s exterior.
Second, do not overmix your batter; slight lumps are good. Overmixing develops gluten, leading to tougher waffles. Third, the melted butter in this recipe is crucial for crispiness.
Finally, avoid opening the waffle iron too early, let the steam escape naturally, and place cooked Crispy Waffles on a wire rack, not a plate, to prevent steaming and softening. These steps guarantee incredibly crispy waffles.
Can I make the waffle batter ahead of time?
Yes, you can absolutely make the batter for your Crispy Waffles ahead of time! Prepare the batter as directed, then cover the bowl tightly with plastic wrap and refrigerate for up to 24 hours. Keep in mind that the leavening agents (baking powder and baking soda) will lose some potency over time, so your waffles might be slightly less fluffy if stored for the full 24 hours.
Give the batter a gentle stir before using. You’ll still get delicious, if not quite as optimally crispy waffles. For best crispiness, fresh batter is always ideal.
Why are my waffles sticking to the waffle iron?
Several reasons can cause your Crispy Waffles to stick. First, ensure your waffle iron is properly preheated. A hot iron helps release the waffle.
Second, always lightly grease your waffle iron with oil or non-stick spray before each batch, even if it’s a non-stick model. Sometimes, older non-stick coatings lose their effectiveness. Third, make sure the waffle is fully cooked.
An undercooked waffle is more prone to sticking. If the problem persists, your waffle iron might need a deeper cleaning or a new non-stick treatment, but these tips help achieve beautiful Crispy Waffles.
What kind of waffle iron is best for crispy waffles?
For the best Crispy Waffles, a good quality waffle iron with adjustable temperature settings is ideal. Waffle irons with deeper grids tend to produce thicker, more substantial waffles with plenty of nooks and crannies for syrup. Cast iron waffle irons can also produce exceptionally crispy results due to their even heat retention, though they require more maintenance. Ultimately, any well-maintained waffle iron, properly preheated, can produce excellent Crispy Waffles using this recipe.
Can I add mix-ins to the batter?
Absolutely! Mix-ins are a fantastic way to customize your Crispy Waffles. After you’ve mixed the wet and dry ingredients, gently fold in your chosen additions.
Popular choices include mini chocolate chips, fresh blueberries, chopped nuts, or shredded coconut. Avoid adding too many mix-ins, as this can affect the batter’s consistency and cooking time, potentially preventing your waffles from becoming perfectly crispy. For best results, keep additions to about ½ to ¾ cup for a batch of this size.
Waffles, a popular dish made from batter or dough cooked between two plates, have a rich history dating back to ancient Greece. While variations exist across cultures, the pursuit of a perfect crisp exterior combined with a fluffy interior, a characteristic often associated with waffles, remains a culinary goal for many home cooks and professional chefs alike.
Nutrition Information (per serving)
Here’s an estimated nutritional breakdown for one serving of these delicious Crispy Waffles, without any toppings. Please note that exact values can vary based on specific ingredient brands and preparation methods. This information helps you enjoy your Crispy Waffles mindfully.
| Nutrient | Amount |
|---|---|
| Calories | 320 kcal |
| Total Fat | 18g |
| Saturated Fat | 11g |
| Cholesterol | 85mg |
| Sodium | 450mg |
| Total Carbohydrates | 34g |
| Dietary Fiber | 1g |
| Total Sugars | 7g |
| Protein | 7g |
Crispy Waffles
Ingredients
Method
- Prepare Your Batter: In a large bowl, whisk together the all-purpose flour, granulated sugar, baking powder, baking soda, and salt. Make sure these dry ingredients are thoroughly combined.
- Combine Wet Ingredients: In a separate medium bowl, whisk the large eggs until lightly beaten. Then, add the buttermilk, melted unsalted butter, and vanilla extract. Whisk these wet ingredients together until well combined.
- Mix Wet into Dry: Pour the wet ingredient mixture into the dry ingredient mixture. Stir gently with a whisk or spatula until just combined. A few lumps are perfectly fine; in fact, slight under-mixing helps keep your Crispy Waffles tender. Do not overmix the batter, as this develops gluten and can lead to tough waffles.
- Rest the Batter: Let the waffle batter rest for 5-10 minutes.
- Preheat Waffle Iron: While the batter rests, preheat your waffle iron according to the manufacturer's instructions.
- Grease and Pour: Lightly brush or spray the waffle iron plates with vegetable oil or non-stick spray, even if it's non-stick. Pour about ½ to ¾ cup of batter onto the hot waffle iron, depending on your waffle iron's size. Do not overfill.
- Cook to Golden Perfection: Close the waffle iron lid and cook until the waffles are golden brown and crisp. This usually takes 3-5 minutes, but cooking times vary by waffle iron. Resist the urge to open the lid too early.
- Serve Immediately: Carefully remove the finished Crispy Waffles with a fork or tongs. Serve them warm with your favorite toppings. For maximum crispiness, transfer cooked waffles to a wire rack while you cook the remaining batter, preventing them from steaming and softening.