
The scent of fresh lemons always transports me back to my childhood kitchen, a place filled with laughter and the promise of something delicious baking. Now, as a mom of three, I find immense joy in recreating those cherished memories for my own children. There’s nothing quite like the collective cheer that erupts when a tray of bright, sunshine-yellow bars emerges from the oven.
For years, I’ve refined my recipe, tweaking and tasting, until I finally landed on what I confidently call the best homemade Lemon Bars. These homemade Lemon Bars aren’t just a dessert; they’re a hug on a plate, a burst of tangy sweetness that instantly brightens any day. It’s a simple lemon bar recipe, yes, but it delivers on flavor in a way that feels both gourmet and utterly comforting.
From the buttery shortbread crust to the creamy, zesty filling dusted with powdered sugar, every bite is a little piece of heaven. Making homemade lemon bars is truly a labor of love, and I promise you, these bright lemon bars will become a staple in your home too.
Why You’ll Love This Recipe
You will absolutely adore Emilia’s best homemade Lemon Bars, I promise. First, their simplicity makes them perfect for busy parents or anyone new to baking. You don’t need fancy equipment or advanced skills to achieve perfection.
Second, the flavor profile is simply unmatched. The sharp, vibrant lemon filling perfectly balances the sweet, tender shortbread crust, creating an irresistible contrast. Furthermore, these incredible lemon bars are versatile.
They make an ideal dessert for a family dinner, a delightful treat for a potluck, or a welcome gift for a friend. Moreover, they keep well, meaning you can enjoy their deliciousness for days. Finally, making them from scratch fills your home with the most incredible citrus aroma, a sensory experience in itself. This recipe truly delivers happiness in every square.
Ingredients You’ll Need
Creating the best homemade Lemon Bars begins with high-quality, simple ingredients. Gather these kitchen staples, and you’re well on your way to a truly memorable dessert. Each component plays a vital role in achieving that perfect balance of crumbly crust and tangy filling. For perfect homemade Lemon Bars, always opt for fresh lemon juice and zest; bottled juice simply won’t yield the same vibrant flavor.
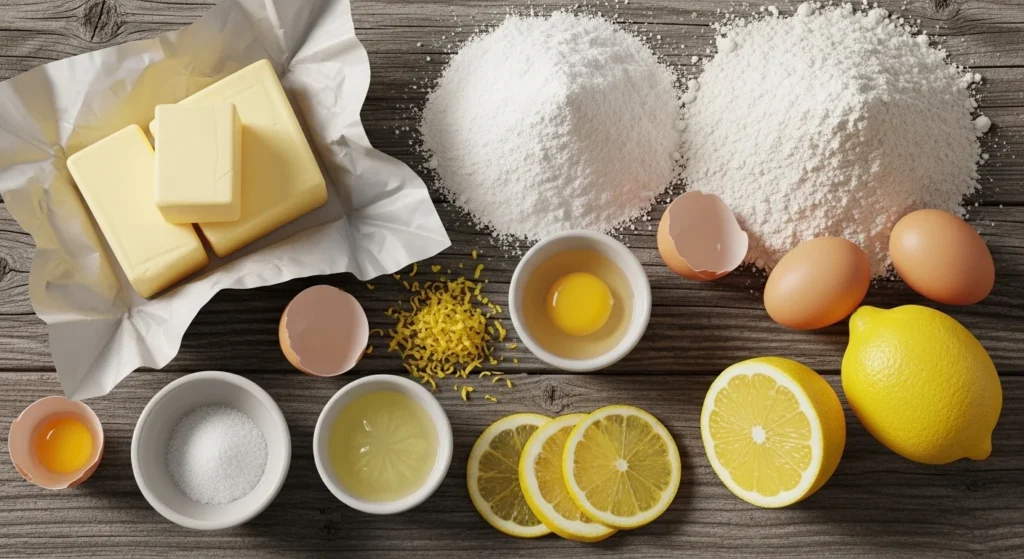
| Ingredient | Quantity |
|---|---|
| Unsalted Butter (cold, cut into cubes) | 1 cup (2 sticks) |
| All-Purpose Flour | 2 cups + 1/4 cup |
| Granulated Sugar | 1/2 cup + 2 cups |
| Salt | 1/4 teaspoon + 1/4 teaspoon |
| Large Eggs | 4 |
| Fresh Lemon Juice | 2/3 cup (about 4-5 lemons) |
| Lemon Zest | 2 tablespoons (from 2-3 lemons) |
| Powdered Sugar (for dusting) | 2-3 tablespoons |
Substitutions & Variations
You can easily adapt your homemade lemon bars to suit different tastes or dietary needs. Flexibility is key in my kitchen! If you don’t have fresh lemons, you can use bottled lemon juice, though the flavor will be less intense.
However, I highly recommend fresh for the best homemade Lemon Bars experience. For a gluten-free version, simply substitute the all-purpose flour with a 1:1 gluten-free baking blend. Ensure your blend contains xanthan gum for the best texture.
You can also experiment with different citrus fruits. Lime bars are a delightful alternative, offering a slightly different tang. Orange bars provide a sweeter, milder citrus flavor.
For an extra touch of flavor, try adding a teaspoon of vanilla extract to the crust mixture. Some people love a hint of almond extract in their lemon filling too. If you prefer a less sweet lemon bar, reduce the granulated sugar in the filling by a quarter cup.
Conversely, for a sweeter bar, you can add an extra tablespoon or two. You can also mix in some shredded coconut to the crust for a tropical twist. Feel free to get creative and make your lemon bars truly your own!
Just as adapting your lemon bars allows for diverse enjoyment, embracing homemade options can transform any meal. If you enjoy starting your day with a comforting, personalized touch, learn how to make the perfect sweet & savory homemade McGriddle breakfast sandwich, another delightful recipe you can customize to your liking.
Step-by-Step Instructions
Crafting the best homemade Lemon Bars is a straightforward process, even for beginners. Follow these simple steps carefully, and you’ll soon enjoy a truly delightful treat. This recipe breaks down into two main parts: the crust and the filling.
1. Prepare the Crust:
* Preheat your oven. Set it to 350°F (175°C).
* Line your baking dish. Use a 9×13-inch baking pan. Line it with parchment paper, leaving an overhang on the sides.
This makes lifting the bars out much easier.
* Combine dry ingredients. In a large bowl, whisk together 2 cups all-purpose flour, 1/2 cup granulated sugar, and 1/4 teaspoon salt.
* Cut in the butter. Add the cold, cubed butter to the dry ingredients. Use a pastry blender, two knives, or your fingertips to cut the butter into the flour mixture.
Mix until the mixture resembles coarse crumbs. Some pea-sized pieces of butter are fine.
* Press into the pan.
Firmly press the crumb mixture evenly into the bottom of your prepared baking pan. Make sure it forms a compact layer.
* Bake the crust.
Bake for 18-20 minutes, or until the edges just begin to turn golden brown. Remove from the oven and set aside while you prepare the filling.
2. Make the Lemon Filling:
* Whisk eggs. In a medium bowl, whisk the 4 large eggs until lightly beaten.
* Add remaining ingredients. Gradually whisk in 2 cups granulated sugar, 1/4 cup all-purpose flour, 1/4 teaspoon salt, 2/3 cup fresh lemon juice, and 2 tablespoons lemon zest. Whisk until the mixture is smooth and well combined.
* Pour over crust. Carefully pour the lemon filling over the warm, pre-baked crust.
* Bake the bars.
Return the pan to the oven. Bake for an additional 20-25 minutes, or until the center is set and no longer jiggles when you gently shake the pan. The edges may turn a slightly darker yellow.
* Cool completely. Remove the pan from the oven. Let these classic lemon bars cool completely at room temperature on a wire rack.
This step is crucial for proper setting. Then, transfer the pan to the refrigerator and chill for at least 2 hours, or preferably overnight.
* Cut and dust.
Once thoroughly chilled, use the parchment paper overhang to lift your homemade lemon bars out of the pan. Place them on a cutting board. Dust generously with powdered sugar just before serving.
Slice into squares using a sharp knife. Clean the knife between cuts for neat edges.
Pro Tips for Success
Achieving the perfect batch of the best homemade Lemon Bars requires a few simple tricks. These tips will elevate your baking and ensure a flawless result every time. First, always use fresh lemons for both juice and zest.
Bottled lemon juice lacks the vibrant, complex flavor that makes these bars so special. Zest the lemons before juicing them; it’s much easier! Second, ensure your butter for the crust is very cold.
This creates a tender, flaky shortbread. If your butter softens, pop it back in the fridge for a few minutes. Third, do not overbake the filling.
Overbaking can result in a rubbery texture. The center should still have a slight “jiggle” when you remove it from the oven, as it will continue to set as it cools.

Fourth, let the bars cool completely at room temperature before chilling them. Rushing this step can lead to a messy, unset filling. Chilling for at least two hours, or even overnight, is vital for clean cuts and a firm texture.
Fifth, for beautifully clean slices, use a hot, sharp knife. Run your knife under hot water, wipe it clean, then make a cut. Repeat this process for each slice.
Finally, dust your beautiful lemon bars with powdered sugar just before serving. This prevents the sugar from dissolving into the lemon filling and keeps them looking fresh and appealing.
Applying these precise techniques ensures your lemon bars are nothing short of perfect, much like how a little creativity can elevate even the simplest dishes into something extraordinary. For another exciting and fun culinary adventure that brings joy, try these Taco Cupcakes: The Fun, Tasty Twist on a Classic Favorite.
Storage & Reheating Tips
You can easily store your delicious homemade lemon bars to enjoy them for several days. Proper storage ensures they retain their fresh taste and perfect texture. Once completely cooled and cut, store the lemon bars in an airtight container in the refrigerator.
They will keep well for up to 5-7 days. I often place a piece of parchment paper between layers if I stack them, to prevent sticking. For longer storage, you can freeze these amazing lemon bars.
Arrange the cut bars in a single layer on a baking sheet and freeze until firm, about 1-2 hours. Then, transfer the frozen bars to a freezer-safe airtight container or freezer bag. They will keep in the freezer for up to 3 months.
Thaw frozen lemon bars in the refrigerator overnight or at room temperature for a couple of hours before serving. There’s no need to reheat lemon bars; they taste best chilled or at room temperature.
What to Serve With This Recipe
Serving the best homemade Lemon Bars offers a delightful versatility. Their bright, tangy flavor pairs wonderfully with a variety of accompaniments. For a simple yet elegant dessert, I often serve them just as they are, perhaps with a fresh dusting of powdered sugar.
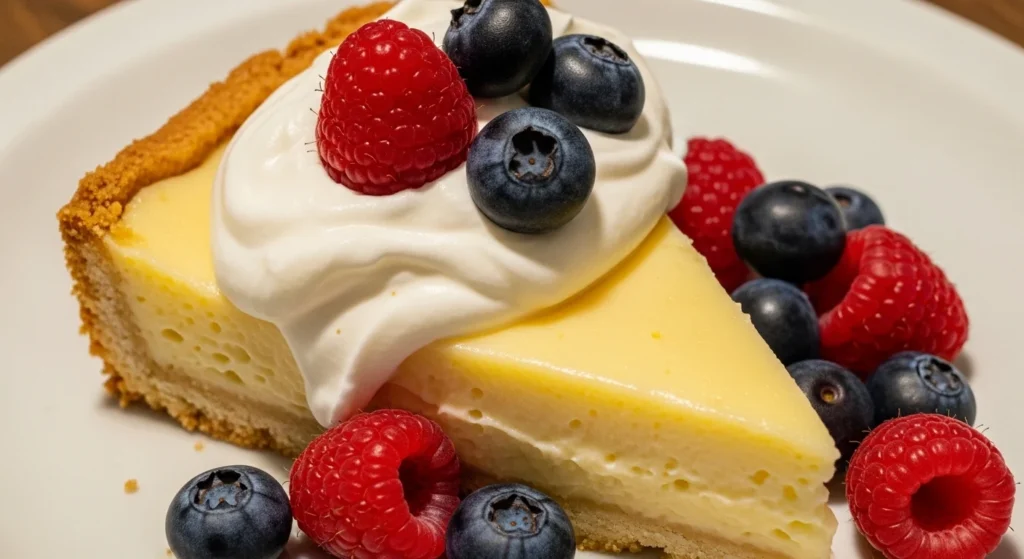
A dollop of freshly whipped cream or a scoop of vanilla bean ice cream complements the tartness beautifully, adding a creamy contrast. You can also pair your incredible homemade lemon bars with fresh berries, like raspberries or blueberries, for an extra burst of freshness and color. A hot cup of tea or coffee makes a perfect companion for an afternoon treat.
For a brunch spread, alongside these, consider serving a fruit salad or a light yogurt parfait. They also make an excellent addition to a dessert platter, balancing out richer, chocolate-based desserts. Remember, the goal is to enhance, not overpower, their incredible lemon flavor.
Elevating your lemon bars with the perfect accompaniments truly enhances the overall experience, much like understanding the nuances of other favorite dishes can. For example, ensuring you have just the right balance of ingredients is crucial, and you can find out how much shredded cheese on 1 hard shell taco to perfect your next taco night.
FAQs
Can I make these homemade lemon bars ahead of time?
Absolutely! In fact, making the best homemade Lemon Bars ahead of time is highly recommended. The flavors meld and the bars set beautifully when chilled overnight. Prepare them a day or two in advance, store them in the refrigerator, and then slice and dust with powdered sugar just before serving.
How do I store homemade lemon bars?
Store your homemade lemon bars in an airtight container in the refrigerator. They will stay fresh for up to 5-7 days. For longer storage, freeze them in an airtight container for up to 3 months. Thaw in the refrigerator.
Why did my lemon bars turn out rubbery or too firm?
This usually happens if you overbaked the lemon filling. The filling should still have a slight jiggle in the center when you remove it from the oven, as it will continue to set as it cools. Also, ensure you measure your flour accurately; too much flour can also affect the texture.
Can I use Meyer lemons for this recipe?
Yes, you can certainly use Meyer lemons for the best homemade Lemon Bars! Meyer lemons are sweeter and less acidic than regular lemons, so your bars will have a slightly milder, sweeter lemon flavor. You might find you need to adjust the sugar slightly if you prefer a tarter bar, but they are absolutely delicious with Meyer lemons.
Lemon bars, a cherished dessert, are celebrated for their vibrant, tart lemon filling perfectly balanced by a sweet, buttery shortbread crust. This classic treat, often served at gatherings and as an everyday delight, showcases a delightful interplay of textures and flavors that are a testament to traditional confectionery.
Nutrition Information (per serving)
Enjoying each of these homemade lemon bars means indulging in a delightful balance of flavors. While specific nutritional content varies based on exact ingredients and serving size, here’s an approximate breakdown for one square (assuming 16 servings from a 9×13 pan). This provides a general idea of the energy and macronutrients you’ll receive from these delicious treats.
| Nutrient | Amount |
|---|---|
| Calories | 280 kcal |
| Total Fat | 14g |
| Saturated Fat | 8g |
| Cholesterol | 70mg |
| Sodium | 75mg |
| Total Carbohydrates | 38g |
| Dietary Fiber | 0g |
| Total Sugars | 28g |
| Protein | 3g |

the best homemade Lemon Bars
Ingredients
Method
- Prepare the Crust: Preheat your oven to 350°F (175°C).
- Line your baking dish: Use a 9x13-inch baking pan. Line it with parchment paper, leaving an overhang on the sides. This makes lifting the bars out much easier.
- Combine dry ingredients: In a large bowl, whisk together 2 cups all-purpose flour, 1/2 cup granulated sugar, and 1/4 teaspoon salt.
- Cut in the butter: Add the cold, cubed butter to the dry ingredients. Use a pastry blender, two knives, or your fingertips to cut the butter into the flour mixture. Mix until the mixture resembles coarse crumbs. Some pea-sized pieces of butter are fine.
- Press into the pan: Firmly press the crumb mixture evenly into the bottom of your prepared baking pan. Make sure it forms a compact layer.
- Bake the crust: Bake for 18-20 minutes, or until the edges just begin to turn golden brown. Remove from the oven and set aside while you prepare the filling.
- Make the Lemon Filling: In a medium bowl, whisk the 4 large eggs until lightly beaten.
- Add remaining ingredients: Gradually whisk in 2 cups granulated sugar, 1/4 cup all-purpose flour, 1/4 teaspoon salt, 2/3 cup fresh lemon juice, and 2 tablespoons lemon zest. Whisk until the mixture is smooth and well combined.
- Pour over crust: Carefully pour the lemon filling over the warm, pre-baked crust.
- Bake the bars: Return the pan to the oven. Bake for an additional 20-25 minutes, or until the center is set and no longer jiggles when you gently shake the pan. The edges may turn a slightly darker yellow.
- Cool completely: Remove the pan from the oven. Let these classic lemon bars cool completely at room temperature on a wire rack. This step is crucial for proper setting. Then, transfer the pan to the refrigerator and chill for at least 2 hours, or preferably overnight.
- Cut and dust: Once thoroughly chilled, use the parchment paper overhang to lift your homemade lemon bars out of the pan. Place them on a cutting board. Dust generously with powdered sugar just before serving. Slice into squares using a sharp knife. Clean the knife between cuts for neat edges.